Wednesday, April 30, 2008

Roasted Asparagus and Baby Potatoes

A post waiting since early spring, but better late than never

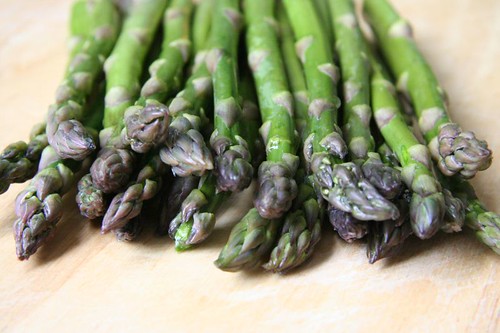
When nature provides most of the flavor, all you need at the most is a little salt and pepper, and a perfect example of that is asparagus in springtime. A drizzle of olive oil clinches it further. Asparagus can be cooked in many different ways like lightly blanched, steamed, or sauteed, but my favorite method is roasting. And while roasted asparagus is wonderful on its own, there is something even better about pairing it with small or new potatoes.

Asparagus: straight from the market

Seriously good eating with a minimalist approach, this is one of my favorite things to make right after I return from the farmers market on weekends in spring for a meal that doesn't require too much effort.

I start the potatoes first because they take longer to cook, and while I put away the purchases and trim the asparagus to remove the lower woody end, it is usually about time to send those in to the oven for their sojourn. Once those are in, I start working on the rest of the meal. That could be soft scrambled or poached eggs with toast, or capellini, which cooks pretty quickly, tossed with some pesto and grated parmesan. The latter is especially wonderful in early summer, when basil starts to come along and we are not yet spring-ed out on asparagus. Sometimes, just soft polenta works beautifully too. So many easy combinations, none of which demand much precision.

Asparagus and new potatoes: roasted

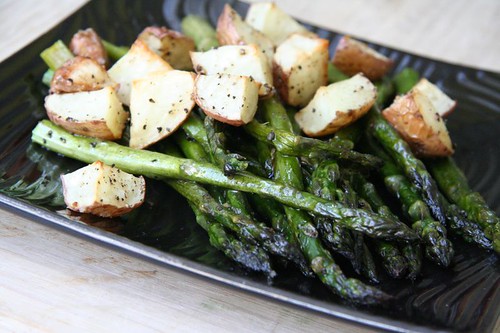
I realized after viewing the pictures that the plate should have been flipped since the light was coming in from the left, which would have highlighted the asparagus and the potatoes would have reflected less light. Always learning.

Roasted New Potatoes, Asparagus

Ingredients

new potatoes
a bunch of asparagus
coarse salt
black pepper, coarsely ground from the peppermill
a couple of tablespoons of olive oil

Method

Preheat oven to 375 degrees. If you are making a larger batch, then up it to 400 degrees.

Wash and clean the potatoes. If the potatoes are tiny, use them whole. If slightly larger, then halved, and if even larger, then quartered. You get the point. Rub them with olive oil, season with coarse salt and pepper, and place them skin side down on one side of a roasting pan or baking sheet.

After 20-25 minutes, repeat the oil, salt, and pepper for the asparagus, add them next to the potatoes, and continue baking for another 15-20 minutes depending on the thickness of the asparagus. For the ultra slim variety 10 minutes is enough. Roll them around once mid-way. Keep an eye on the roasting pan and adjust baking time accordingly. Ideally, but not necessarily, the potatoes and asparagus would be ready at the same time.

Friday, April 25, 2008

Stock up on dental floss

Alphonso/Haapoos: Finally in the US

The Alphonsos, also called Haapoos, are here for real this year. Not a patch on what we had back in the days in India, but some consolation. Enough said.

Click: Au Naturel

Tuesday, April 15, 2008

Come say 'Hello'

At a different kind of milestone

A few months ago, I completed a year of my blog, and many of you wished me then. However, there is another day that is also very important to me, and that is the day when the blog really became public, because Manisha announced and endorsed it on her very popular blog. Until then, I was writing in my own little corner. A few friends who knew about it perhaps read it, but after that day, I was out there for the world to see. I got new readers, some of whom stop by regularly, made some new friends, and found out about many fascinating blogs, but I also suspect that there are some people who might be reading along, but have stayed silent so far for whatever reason. I do that too. So, on this day, I offer you the chance to delurk. Treat this as an open house, and come stop by. If you prefer to stay anonymous, tell me something about yourself. Or not, of course.

Since the post that Manisha linked to was a take on sabudana khichadi, I thought it was only fitting that this post should be about the classic, authentic sabudana khichadi, the real deal. It is truly one of my favorites, but the main thing about getting it right is the quality of sabudana, and how much water it absorbs. I even had one batch that practically turned to powder the minute I added water to it. Ever since, I have been mostly getting sabudana from our regular grocer in India, for the last few years. It sounds like a stretch, but then, on an average, I make sabudana khichadi only a few times in a year, and I want it be as perfect as it can be.

To test the quality, wash about a teaspoon of sabudana, and let it soak in a very small bowl, with just enough water for it to absorb. Cover, and let it sit for a few hours. Then separate the grains and press one of them gently to check. It should be soft and swollen, there should be no leftover water, and minimal powdery stuff. If not, you can use the batch to make sabudana wadas, thalipeeth, kheer, dahi sabudana, or something like that, which can be a lot more forgiving. With these parameters at hand, go ahead and soak a larger batch. Rinse the grains once, and then add just enough water to cover the grains, and not any more.

Sabudana Khichadi

Sabudana Khichadi

Ingredients

1 cup sabudana, soaked for several hours (or overnight) in minimal amount of water
1/2 cup of peanuts, coarsely powdered in a food processor
2 Tablespoons of grated coconut (optional)
salt to taste
1/2 teaspoon sugar
2-3 Tablespoons ghee
1 teaspoon of cumin seeds
2-4 small green chilies
1 small boiled potato (optional)
4 stalks of cilantro, finely chopped (optional)

Method

In a wide bowl, separate the sabudana gently with fork or finger. If there is too much powdery residue, shake off the sabudana in a sieve, and pour it back into the bowl. Add the peanuts, coconut, salt and sugar to the sabudana, and mix evenly.

Chop the chilies, about 1/2 inch wide. If using the potato, chop it into small pieces.

In a large and wide pan, heat the ghee, and add the cumin seeds. When they start to sizzle, add the chilies and stir for a few seconds. Add the potato and stir it around till it gets coated with ghee. Add the sabudana mix, and stir together until the grains get coated too. Keep stirring occasionally for about 10-15 minutes on medium high heat, until the sabudana is well cooked. The stirring is necessary to make sure that the grains do no clump together. If needed, you can add a little more ghee. When completely done, add in the cilantro. Best eaten right away.

Tuesday, April 08, 2008

Chaklis, the first attempt

Chaklis, the ultimate snack

Ingredients

chakli bhaazani
water
red chili powder, hing, salt
oil


Method

Visit the person who you think makes the best chaklis in the whole wide world, during Diwali. Eat chaklis, and start asking questions. Whip out small diary from bag as they talk, and take notes.

Steer the conversation gently until they offer you some of their freshly ground chakli bhaazani. They love you anyway, so that won't be too difficult. In addition, they might also give you their thalipeeth bhaazani, which is not a bad thing at all.

Return home, put the packet in the freezer. After a few months you will hear from them and they will ask whether you got around to making chaklis. Be shameful that you haven't. Put it on a priority list. Wait for a day when the weather is cool but not damp.

Take out the sorya (chakli press) that has been lying unused for a couple of years. Whip out diary again, and follow instructions for making chaklis. Within twenty minutes, gorgeous looking chaklis will be coming out of the frying oil. Go against most instructions and don't wait until they are cool because that is impossible. Check each chakli for optimum crispness. Wonder why some are slightly softer than others. Jump joyously at the ones that have just the right crispness and color. Suddenly remember that pictures of the beauties have to be taken.

Feel confident about a second attempt.

Thursday, April 03, 2008

Green Tomato Rassa

hirvyaa tomatochi bhaaji

Green tomatoes are something I have not seen in supermarkets here, and only rarely in farmers markets, so the only time I have had access to a lot of green tomatoes was when I had planted tomatoes one year and got a bumper crop all throughout summer. While I let most of the tomatoes ripen on the vines, occasionally some of the green ones fell to the ground, and once, an entire branch full of them fell down because of the weight.

Green Tomatoes

Red ripe tomatoes have started showing up at our markets in the last couple of weeks, and one of the farmers even had a small basket of green tomatoes. I grabbed a bunch right away. I didn't even have to think about what I would do with them - it had to be the green tomato rassa style bhaji that was one of my absolute favorites while growing up. Whenever it was made at home, I ate more than usual.

I always use my mother's recipe for this, but naturally, when I make it, it only comes close, and doesn't taste exactly the same. This simple homey side dish is best served with good polis, or thin soft rotis, brushed with a touch of ghee if you like.

Green Tomato Rassa bhaji

Green Tomato Rassa Bhaji

Ingredients

6 medium sized green tomatoes
1-2 Tablespoons oil
1/2 teaspoon mustard seeds
pinch of asafoetida (hing)
1/2 teaspoon turmeric
3/4 teaspoon chili powder (or to taste)
3/4 teaspoon salt (or to taste)
1 teaspoon sugar or jaggery
1 teaspoon goda masala
1 Tablespoon crushed peanuts
1 Tablespoon freshly grated coconut (optional)
2-4 Tablespoons chopped cilantro


Method

Core the tomatoes and chop them into roughly 1 inch sized pieces.

Heat the oil in a saucepan and add mustard seeds. When the seeds start to pop, reduce the heat, add the asafoetida and turmeric. Add the tomatoes, and stir around for a minute or two. Add chili powder and salt. Bring the heat back up, add about a cup (or more as required) of water, and when it comes to a boil, turn the heat down again, and let it simmer until the tomatoes are well cooked and soft but not falling apart. You can place a lid on it, partially, to speed up the cooking.

Since this is a rassa style bhaji, a fair amount of gravy is desirable, which means you can add more water if it gets too thick or too dry.

Finally, add the rest of the ingredients, and let it cook for just a few minutes more until the rassa starts to thicken. After the heat is turned off, let it sit for a few more minutes before serving. This really helps all the flavors to come together.

Variations

Curry leaves can be added just before the tomatoes are added. This wasn't in the original family recipe, but I love the flavor it adds.

Coconut is optional, I usually don't add it.
Related Posts Plugin for WordPress, Blogger...