Colorful, healthy, low fat, vegan (or not), and most important, delicious.
In the last several weeks I have been tackling a project long neglected even though it is very close to my heart; that of organizing recipes that have been sitting in random files and notes for close to two decades. I have two large binders, one which has recipes I have made and would like to make again (keepers, in the current parlance) and another which has recipes that I would perhaps like to make some day (the paper equivalent of bookmarks), and somewhere the lines cross and the mess begins. Most of the recipes and notes are in non-standardized formats, and especially the best ones. From a printout of an email from parents, something scratched on the nearest notepad while on a phone call with a cousin, or clippings from old magazines and papers that do not have digital archives. I didn't have the heart to throw out most of them without taking a look, and I finally found time over the holidays to start reviewing and organizing everything. What good it is otherwise! One by one, I hope to start digitizing everything, either by scanning them for my records, or typing them up on the blog (which would mean I also need to make each dish, photograph it, and type it up), so that all I would have left is a few handwritten recipes that I would keep for sentimental reasons. It is a lofty goal and it might take years to get through a lot of it, but I had to start somewhere.
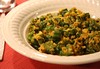
When I started looking through the files, I found so many wonderful notes of things I used to make regularly and enjoy, but somewhere along the years got buried in there. One such gem I found is the salad my mother had made during a trip to India, circa 2003. That was when she used to make lots of vegetable based meals with little or no fat for my father, who had very strict diet restrictions at that time. This salad however can be enjoyed by all, without even realizing that it is very healthy. I wondered why I stopped making it. There was no particular reason that I can think of, except that it is not something I can usually throw together on a whim. It needs a few incongruous ingredients that don't always happen to be at home at the same time. That is also partly what make this salad so wonderful. The combination is unexpected but it just comes together.
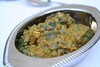
When I made it recently, it was a side to a warm and spicy moogachi khichadi, but it fits in nicely with any meal, with rice and dal, a simple pulao, or alongside a bhaaji or usal.

Green Beans, Carrot, and Cucumber Salad
Serves 3-4, and can be easily multiplied or halved.
1/2 cup finely chopped green beans
1/2 cup grated carrot
1/2 cup chopped onion
1/2 cup peeled, seeded and chopped cucumber (see note 1)
1 small green chili, finely chopped (see note 2)
1/4 cup grated coconut (fresh or frozen)
3/4 teaspoon sugar (do not skimp)
1/2 teaspoon salt, or to taste
2-3 Tablespoons of finely chopped cilantro
1-2 Tablespoons lemon juice OR 1/2 cup (or more) yogurt, but not both (see note 3)
Start by chopping the green beans. Put them in a steamer and steam them for 5-8 minutes until they are tender and cooked to your liking. Take them out of the steamer and let cool.
While the beans are cooking and cooling, prepare the vegetables - grate the carrots, chop the rest. Mix everything together in a bowl.
Notes
In the last several weeks I have been tackling a project long neglected even though it is very close to my heart; that of organizing recipes that have been sitting in random files and notes for close to two decades. I have two large binders, one which has recipes I have made and would like to make again (keepers, in the current parlance) and another which has recipes that I would perhaps like to make some day (the paper equivalent of bookmarks), and somewhere the lines cross and the mess begins. Most of the recipes and notes are in non-standardized formats, and especially the best ones. From a printout of an email from parents, something scratched on the nearest notepad while on a phone call with a cousin, or clippings from old magazines and papers that do not have digital archives. I didn't have the heart to throw out most of them without taking a look, and I finally found time over the holidays to start reviewing and organizing everything. What good it is otherwise! One by one, I hope to start digitizing everything, either by scanning them for my records, or typing them up on the blog (which would mean I also need to make each dish, photograph it, and type it up), so that all I would have left is a few handwritten recipes that I would keep for sentimental reasons. It is a lofty goal and it might take years to get through a lot of it, but I had to start somewhere.
When I started looking through the files, I found so many wonderful notes of things I used to make regularly and enjoy, but somewhere along the years got buried in there. One such gem I found is the salad my mother had made during a trip to India, circa 2003. That was when she used to make lots of vegetable based meals with little or no fat for my father, who had very strict diet restrictions at that time. This salad however can be enjoyed by all, without even realizing that it is very healthy. I wondered why I stopped making it. There was no particular reason that I can think of, except that it is not something I can usually throw together on a whim. It needs a few incongruous ingredients that don't always happen to be at home at the same time. That is also partly what make this salad so wonderful. The combination is unexpected but it just comes together.
When I made it recently, it was a side to a warm and spicy moogachi khichadi, but it fits in nicely with any meal, with rice and dal, a simple pulao, or alongside a bhaaji or usal.
Green Beans, Carrot, and Cucumber Salad
Serves 3-4, and can be easily multiplied or halved.
1/2 cup finely chopped green beans
1/2 cup grated carrot
1/2 cup chopped onion
1/2 cup peeled, seeded and chopped cucumber (see note 1)
1 small green chili, finely chopped (see note 2)
1/4 cup grated coconut (fresh or frozen)
3/4 teaspoon sugar (do not skimp)
1/2 teaspoon salt, or to taste
2-3 Tablespoons of finely chopped cilantro
1-2 Tablespoons lemon juice OR 1/2 cup (or more) yogurt, but not both (see note 3)
Start by chopping the green beans. Put them in a steamer and steam them for 5-8 minutes until they are tender and cooked to your liking. Take them out of the steamer and let cool.
While the beans are cooking and cooling, prepare the vegetables - grate the carrots, chop the rest. Mix everything together in a bowl.
Notes
- You can chose to not peel or seed the cucumber if you like.
- The chili gives the salad a spicy bite but not too much. If you prefer mild food, use only half of the chili if it is very sharp, or remove the seeds, or use a sprinkle of cayenne or Indian red chili powder.
- When I first had it, it was made with lemon juice, but one time I added yogurt when I had a friend over because I know she likes yogurt and it certainly changed it to something else. I make both versions, depending on what else is part of the meal.