When I go out to eat, I usually like to order something that I don't particularly enjoy making at home either because it is too complicated, or needs a lot of time or patience, or involves deep frying, or for myriad other reasons. So I was quite surprised when I was eating with a bunch of friends when someone ordered 'Bhindi Masala'. Why would one order something as simple as that, I thought. I know that everyone has their own preferences when eating out, and some prefer to stay within familiar limits, but this wasn't the case here. As it turned out, she was not very comfortable making it at home. I know she is a good cook, so it had nothing to do with her skills either. Perhaps she did not have a good recipe. Whatever. I will leave that in the realm of conjecture.
There are many people who have extreme reactions to Okra (Bhindi in Hindi, Bhendi in Marathi, Bhinda in Gujrati). There are those who like it so much that they can eat it as often as they can, and there are those who cannot stand it, usually because of the seeds or because of the slime. Then there are those like me who are more, ahem, balanced, about it. We like to eat it once every so often, but will not go overboard with it.
Selecting Okra
Fresh okra is available increasingly now in regular grocery stores as well as at farmers' markets, and especially during spring and summer. Look for uniformly green pods, that are tender and firm but not tough. Oh, and try not to snap the end of each pod to check if they are good. Snap one if you must, and if a batch is good, they are all likely to be good.
Cleaning and Prepping Okra
To avoid the okra getting slimy while it is being cooked, it is important that it is very dry beforehand. Washing okra is not recommended. I wipe each pod of okra with a damp towel, and let it dry completely before chopping. Trim off the ends before chopping it further as required by a recipe. Some preparations like 'Stuffed Bhindi' need only one slit along the length to create a pocket for the filling.
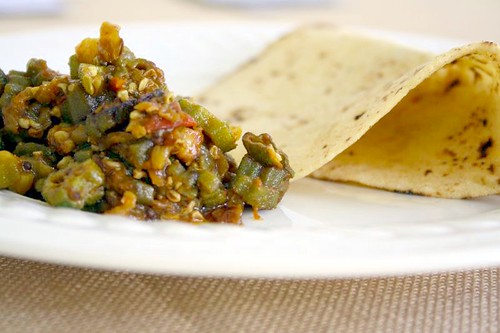
I make 'Bhindi Masala' two different ways, sometimes with tomato and sometimes without it, and I like both of them. Okra is capable of taking a lot of spice without getting too spicy, so do not be afraid to season it well. While cooking, add salt only towards the end, as salt tends to draw out moisture, which makes it undesirably sticky. I like the okra to be cooked well, to a point where it is crisp and has some brown spots. Best to serve with phulkaas, parathas, or rotis, with any kind of thick dal on the side.
Bhindi Masala (with tomato)
1 lb bhindi (okra)
1 medium yellow onion
1-2 ripe tomatoes, (1 is enough if it is large)
2-3 Tablespoons of oil
1 teaspoon of ghee (optional, but definitely adds to the flavor)
pinch of mustard seeds
1/2 teaspoon of cumin seeds
1/4 teaspoon of fennel seeds
1/4 teaspoon of turmeric
1/2 teaspoon of chili powder
1/2 teaspoon cumin powder
1/2 teaspoon coriander powder
few pinches ground black pepper
1/2 teaspoon amchoor (dried raw mango powder)
1/2 teaspoon garam masala
1/2 teaspoon of sugar
1 teaspoon salt, or to taste
2 Tablespoons chopped cilantro, optional
Clean the okra with a damp towel, and after it is completely dry, slice each pod of okra into thin rounds, discarding the ends. Slice the onion thinly and chop the tomato finely.
In a large kadhai or wok, heat the oil and ghee, and add mustard seeds. When they start to pop, add the cumin and fennel seeds, followed by onion, and saute for a minute. Add turmeric and okra and saute till it starts to change color slightly. Let it cook for a few minutes, then add the tomatoes and chili powder, and continue to stir-fry on medium-low heat until everything is cooked together, which takes 5-10 minutes depending on the okra. At the end, add salt, and the remaining spices, and keep cooking for a few more minutes on low heat, stirring if required. Add cilantro.
Without tomato
Everything stays the same, but increase the amount of amchoor to 1 teaspoon, and do not add sugar. The okra tends to get crisper in this version; since there is no tomato, the overall moisture content is reduced.
Note: A true Punj is likely to scoff at the mention of sugar in a sabjee, even in a tiny amount, so feel free to leave it out for authenticity's sake. I think it balances the acidity of the tomato and amchoor and helps to caramelize the okra very well. Mustard too, is not commonly added to Punjabi sabjees, so you can leave that out too.
I am sending this to the 'Regional Cuisines of India - Punjab' event.
Friday, June 29, 2007
Friday, June 22, 2007
Ginger Chai Masala Spiced Scones
While reading some of the food blogs, I noticed a lot of them displaying icons for an event called WBB. That sent me searching for what it meant, and found out that it stood for 'Weekend Breakfast Blogging'. Ah, I see. Quite fortuitous, as I was about to post a recipe that would fit in with the latest theme 'Spice it up'.
When I saw this recipe for Lavender Scones in Sunset, the first thought that crossed my mind was that I wanted to try it out with Chai Masala, instead of the lavender. I liked the idea of steeping it in milk to infuse its flavor and then using that in the dough. Instead of lemon zest, I used chopped crystalized ginger for compatibility.
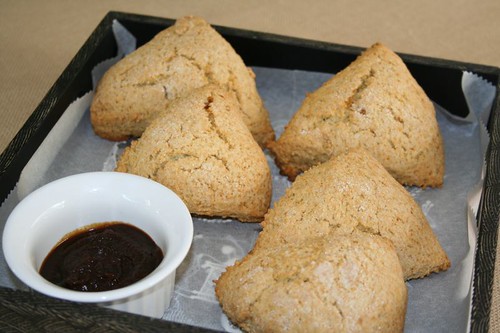
The resulting scones were light and airy, with a mild scent of chai masala, and predominant notes of cardamom and ginger, but faint enough to make one wonder what exactly it is. I served these with a bit of jam, but that seemed unnecessary. They are wonderful on their own, with tea, coffee, or milk.
Here is the adapted recipe, with all the changes I made to it.
Ingredients
1/2 cup milk
1 teaspoon chai masala (*see note below)
1 1/2 cups all-purpose flour
1/4 cup sugar
1 1/4 teaspoons baking powder
1/2 teaspoon baking soda
1/4 teaspoon salt
1/3 cup (5-1/3 Tablespoons) butter, chilled and cut into small pieces
2 Tablespoons fresh finely chopped crystallized ginger (candied ginger)
2 Tablespoons turbinado sugar
Preparation
1. In a saucepan over medium heat, bring milk and chai masala to a simmer. Let it steep for 15 minutes, then cover and chill for about 45 minutes. Strain the milk and set aside; discard the chai masala.
2. Preheat oven to 375° F. In a food processor, whirl flour, sugar, baking powder, baking soda, and salt for a few seconds. Add butter and chopped crystallized ginger and pulse to form a coarse meal. Add masala-infused milk and pulse to form a shaggy dough. Turn dough onto a floured surface and knead 3 to 5 times, just enough to form a ball.
3. Form dough into a 6-inch. circle. Cut into 6 wedges. Arrange wedges 2 inches apart on a baking sheet and sprinkle each lightly with turbinado sugar. Bake until golden, 20 to 25 minutes.
Yield: Makes 6 scones
Note: You could use your favorite homemade or store-bought chai masala. If you do not have access to it, you could subtitute with a mix of powdered ginger, cardamom, cinnamon, cloves, and a touch of black pepper, a teaspoon in total.
I am sending this to WBB #12 : Spice it up
Sunday, June 17, 2007
Cherry Cobbler
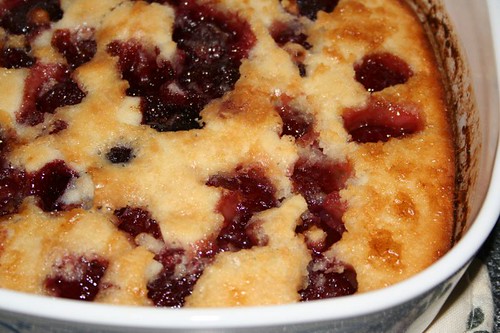
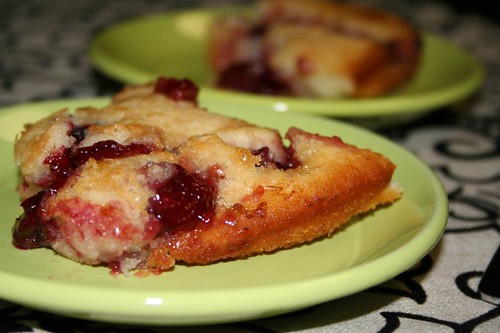
I mentioned earlier about picking tons of cherries and lugging them home from the orchard. After I gave away a few packets of these fresh cherries to friends, one of the things I made right away was Cherry Pickle. I liked it so much that I made another double batch of it, and gifted some of that too. Most of the remaining ones were used for snacking and as a natural dessert, but I also wanted to cook something with them. So while searching for recipes that use fresh cherries, I found this Cherry Cobbler, and decided to give it a try. It was absolutely delicious. Of course, if it was anything less than that, I would not have blogged about it. It is worth mentioning that it was even better the next day, warmed just a bit, so it is something that can be made in advance too.
Since the cherries I used were very sweet, I reduced the amount of sugar in it, and added a dash of vanilla extract for flavor. I made only half of the recipe, which is something I really regreted.
Noting the recipe here for reference, along with a few changes.
Ingredients
1/2 cup butter
2 cups pitted sweet bing cherries
1/3rd cup white sugar
1 tablespoon all-purpose flour
1 cup all-purpose flour
1 cup white sugar
1 teaspoon baking powder
1 cup milk
a few drops of pure vanilla extract
Method
Preheat the oven to 350 degrees F (175 degrees C). Place the butter in a 9x13 inch baking dish, and place in the oven to melt while the oven is preheating. Remove as soon as butter has melted, about 5 minutes.
Place the cherries into a bowl, and toss with the 1/3rd cup of sugar and 1 tablespoon of flour.
In a medium bowl, stir together 1 cup of flour, 1 cup of sugar, and baking powder. Mix in the milk and vanilla extract until well blended, then pour the batter into the pan over the butter. Do not stir. [Note: I think it might not hurt to stir this together a little. The butter at the edges is what causes the brown lines along the side of the pan]
Distribute the cherry mixture evenly over the batter. Do not stir.
Bake for about 45-50 minutes in the preheated oven, until golden brown. A toothpick inserted into the cobber should come out clean.
This is a hastily taken picture before gobbling.
Archana's cherry lassi was on the radar, but that will have to wait now.
Thursday, June 14, 2007
A spin on the farmer's lunch
Pithale - Bhakri Sandwich
Growing up in a big city, having a yard was a dream, and being on a farm was just impossible. In fact there wasn't a farm to be seen for miles. So you have to forgive me, but my idea about farmers on the deccan plateau of Maharashtra was derived from geography books, and marathi movies that were shown on Doordarshan on Saturday evenings. These movies often romanticised the hard working farmer (shetkari), who ate a humble lunch of pithale and bhakri, wrapped in a cloth, with a garlic chutney and chilies on the side, washed down with buttermilk. It was an impressionable age, after all, and this was the image that lasted with me.
Apart from something seen from a car or bus, I have yet to see a real farm in Maharashtra or meet a farmer who eats such a lunch, but I think I am on the right track about the food. While the visit remains a dream, the lunch is much more achievable, and hopefully atleast half as good. After all, nothing can replace that smell of the earth and the crops swaying in the field, as I partake a fresh warm bhakri.
About the main components
Pithale, pronounced 'piTh-luh', but usually spelled in English as 'pithale', is a dish made out of chickpea flour (besan), with basic ingredients that are typically available in the pantry. It is unbelievably quick and easy, as you will see in the recipe below. The thickness of the pithale varies from runny to scrambled depending on the preferences of people. It can be thickened even further, at which point it beomes very dry, nearly crisp, but not completely, which is then referred to as 'zunkaa'.
Bhakri (bhAkri, bhaakri) is a flatbread, made by patting the dough on a flat surface, rotating it as it flattens and spreads. Easier said than done, as I know from experience. I have tried to learn it from someone who has made bhakris for years, and hoped to emulate her, but have abandoned it now as something I might not be able to do. There are bhakris made out of bajri, jowar, nachani, even rice.
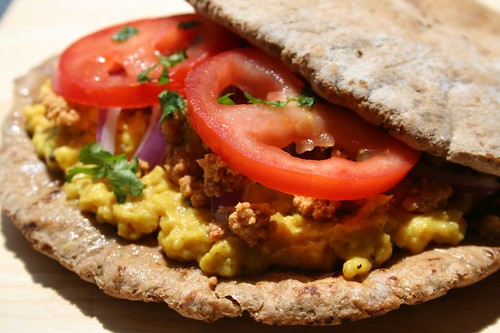
Here, I have adapted the concept, to make a handy sandwich, which can be enjoyed outdoors, or anywhere else. It is a great option for a picnic lunch or a busy weeknight dinner.
Pithale - Bhakri Sandwich
Ingredients:
1 small onion
3/4 th cup besan (chickpea flour)
2 Tablespoons oil
1/2 teaspoon mustard seeds
pinch of hing (asafoetida)
1/2 teaspoon turmeric
1-1/2 teaspoons kanda-lasun masala (*see note)
4 whole wheat pita breads
a little softened butter or ghee
1 tomato, sliced
4 Tablespoons peanut sesame chutney or to taste
4 Tablespoons chopped cilantro
Peel the onion, cut 2 or 3 round slices, separate into rings, and leave these aside to add to the sandwich. Chop the rest of the onion. In a medium bowl, add a little water to the besan, just enough to make a thick paste.
Heat the oil in a wok or kadhai. Add the mustard seeds, and when they pop, add the hing, turmeric, chopped onion and kanda lasun masala. Saute it for a few minutes until the onion softens, and add half a cup of water. When the water comes to a boil, add in the besan paste, and stir continuously with a wooden spoon as it starts to thicken. Stir it until it forms a thick mass, roughly scrambled.
Apply butter to the pita breads, and spread some of the pithale on it. Top with the reserved sliced onion, chutney, cilantro, and tomato. Cover with another pita bread, press gently, and slice into two or four. Repeat for the other sandwich.
This will make 2 sandwiches.
Notes and Variations:
* In this recipe, you could substitute the kanda-lasun masala with 2 cloves of minced garlic, 1/2 teaspoon red chili powder, and 1 minced scallion.
If you like very spicy food, you could add some red chili powder to the paste, depending on how hot the kanda lasun masala is.
I use whichever chutney is on hand - garlic chutney or cilantro chutney works just as well, although they lack the crunch of the peanuts.
Add some lettuce leaves to the sandwich if you like.
I am sending this too to the 'Regional Cuisines of India - Maharashtra' event.
Monday, June 11, 2007
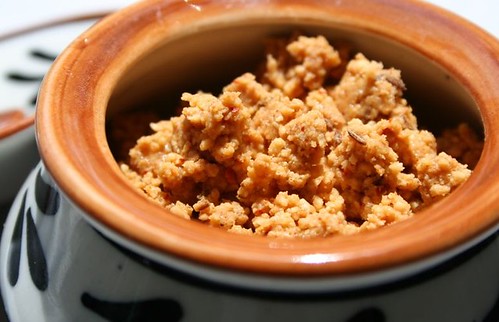
Peanut Sesame Chutney
Good things come in small packages
It would be an understatement to say that chutneys are an integral part of an Indian meal. They come in countless forms and combinations, and are used as condiments to zip up something that someone might find bland. In traditional maharashtrian meals, chutneys are generally served as part of a meal, in small quantitites, on the top left side of the plate.
This is a simple dry chutney that takes only minutes to make, but is high on flavor and very versatile. Since it is dry, it also lasts for a long time. In marathi it could be called 'shengdANe ANI tILAchi chaTNI'.
Ingredients
1 scant cup of peanuts
2 Tablespoons sesame seeds
2 dried red chilies
1 teaspoon cumin seeds
1/2 teaspoon red chili powder
1/2 teaspoon salt (or to taste)
1 teaspoon sugar
Method
On a medium skillet, roast the peanuts, sesame seeds, chilies and cumin seeds for a few minutes. Take it off the heat and let it get cool. Add the chili powder, salt, and sugar to it, and powder everything in a food processor. Do not over process, as it could get sticky. It will keep in an airtight container for several days, even weeks.
Serving Suggestions:
While this chutney can be definitely served as part of a meal, there are plenty of uses for it that I like. It can be stirred into some sesame oil to eat with dosas and idlis, or it can be stirred into some yogurt to make a wet chutney.
Other uses:
Add it to simple salads like onion-tomato or tomato-cucumber. Add it to sauteed okra at the end for an added crunch and taste. Sprinkle some on top of a bagel with cream cheese, a new favorite use.
I am sending this to the 'Regional Cuisines of India - Maharashtra' event.
Friday, June 08, 2007
Vibrant Vancouver
When a neice called me up a couple of months ago to say that she will be in Vancouver for a project, I immediately started looking for flight tickets. Of course, it wasn't until she got somewhat settled that I made real plans to go there. I had visited Vancouver a few years ago, and was quite smitten with the place and the surrounding area of British Columbia at that time. So this was a good excuse to go and hang out in the city, where she is now living it up in a downtown high-rise.
On my previous trip I had been to Victoria, which is a charming ferry ride away to Vancouver Island, and had done the obligatory road trip to Whistler, which was also beautiful. This time, I just wanted to spend more time in the city, walk around and use the skytrain, go bicyling, and enjoy life in the city itself, and had a swell time doing just that. The weather was gorgeous on all the days, in fact, it was too hot for this time of the year, but that is any day better than rain.
Vancouver is a vibrant young city, very compact and easy to navigate, surrounded by water and mountains, with plenty of places for good food, and lots of activity. We started off by walking along the waterfront, and then later in the afternoon took the seabus to Lonsdale Quay. Walked around the market there, had a crepe with ice cream, and returned back to continue walking in Gastown.
I had been to Capilano before, so this time we went to Lynn Canyon, where there is a suspension brige as well, from where we hiked up to Rice Lake. Spent the gorgeous evening later at Kits beach, in the Kitsilano neighborhood. The day was heating up so much at that point that I actually got tanned.
Another thing we did was to rent bicycles and go riding along the seawall in Stanley Park. Awesome. Part of the seawall is closed for reconstruction right now, which took away some of the joy of doing the whole loop of the park along the water, but there was still plenty to enjoy.
The only place that got a repeat visit was Granville Island - I love it. There is the public market, cute stores to browse, and it is easy to get to from downtown either by bus, or across the False Creek by aquabus.
Will leave you with some more pictures. You can click on an image to see the larger version.
Wednesday, June 06, 2007
Subscribe to:
Posts (Atom)