Everything I learned about "ridge gourds", I learned online. This might sound like an exaggeration, but it is very close to the truth. Ridge gourd, which is called 'doDake' or 'shiraLe' in Marathi, and 'turai' in Hindi is a vegetable that I wasn't familiar with while growing up. While it is quite commonly used in most regions of India, I don't recall eating it much, if at all, and I know for sure I never ever watched anyone cooking it either at my home or anyone else's.
Like many other vegetables that I had never tried before, I began to see loads of beautiful gourds in the Asian stalls at the local farmers market, and was tempted to try it out. I started looking for recipes to use it, and found plenty of ideas online. But I was clueless right from selecting the gourds. Are the smaller ones better or the larger? Slim better or hefty? I had to even search online for instructions on how to peel and prepare them before using in a recipe. After reading and searching about it, I felt I was finally ready to cook with it.

The first thing I ever cooked was this 'Ridge Gourd with dumplings' sabjee, about five years ago. I used oat flour instead of jowar, and made the dumplings bite sized, about the same size that I chopped the gourds into. It was such a hit that I made it repeatedly. Soon after that, I started looking for more recipes to expand my repertoire, and tried this 'Stuffed Ridge Gourd' which was an instant hit too. I realized that I enjoyed the slightly earthy taste and texture of of this vegetable, unlike some of my other family members, because of which the vegetable must have never made an appearance in our house.
Then one day, when there wasn't enough time to make the dumplings, or the stuffing, I wanted to make some kind of a quick saute bhaaji (chop, sizzle, and stir) and that was when I deconstructed Mint's 'Ridge Gourd chutney' to make a bhaaji, and it has become a huge favorite ever since.Here it is, adapted and translated with her permission.

Ingredients
2-3 ridge gourds (depending on their size)
4 cloves of garlic
4 green chilies
1-2 Tablespoons oil
1/4 teaspoon mustard seeds
pinch of asafoetida
1/2 teaspoon turmeric
a few curry leaves (optional)
3-4 tablespoons crushed peanuts
1-2 Tablespoons dried shredded coconut
1/2 teaspoon salt, or to taste
about 4 Tablespoons chopped cilantro
Method
Cut off the ends of the ridge gourds. Scrape off the bumpy ridges with a vegetable peeler. Cut each into half lengthwise, and then slice crosswise into half moons. Add the pieces to a bowl of cold water with a teaspoon of salt, for about 10-15 minutes, and drain in a colander before using.
In the meanwhile, prepare the other things. Peel the garlic. Remove the stems of the green chilies and wash them. In a mortar and pestle, smash the garlic and chilies together until they barely hold their shapes. Do not smash into a paste, but you need them to release all their flavor.
Heat the oil in a wide pan or wok. Add the mustard seeds, and when they start to pop, add the asafoetida, turmeric, curry leaves, smashed garlic and chilies, and stir for a few seconds or until the garlic starts to change color slightly.
Add the chopped ridge gourd, and saute just until coated with the seasoned oil. Cook on medium-high heat, stirring occasionaly, until the ridge gourd is almost done. The gourds usually release a fair amount of water, so I do not cover them while cooking.
In the meanwhile, roast the coconut in a small dry skillet until it turns slightly golden brown. When it is cool enough to handle, crush it coarsely with fingers, or a rolling pin, or a pestle.
Add salt to taste, and the crushed peanuts and coconut to the vegetable in the last couple of minutes before turning the heat off, and stir everything around. Add the cilantro just before serving, and serve warm, with polis or rice and dal.

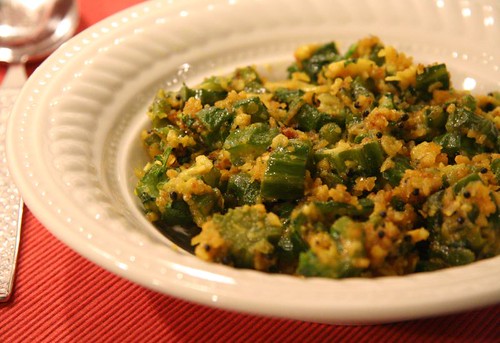
Dodkyachi Bhaaji served with Polis
Like many other vegetables that I had never tried before, I began to see loads of beautiful gourds in the Asian stalls at the local farmers market, and was tempted to try it out. I started looking for recipes to use it, and found plenty of ideas online. But I was clueless right from selecting the gourds. Are the smaller ones better or the larger? Slim better or hefty? I had to even search online for instructions on how to peel and prepare them before using in a recipe. After reading and searching about it, I felt I was finally ready to cook with it.

The first thing I ever cooked was this 'Ridge Gourd with dumplings' sabjee, about five years ago. I used oat flour instead of jowar, and made the dumplings bite sized, about the same size that I chopped the gourds into. It was such a hit that I made it repeatedly. Soon after that, I started looking for more recipes to expand my repertoire, and tried this 'Stuffed Ridge Gourd' which was an instant hit too. I realized that I enjoyed the slightly earthy taste and texture of of this vegetable, unlike some of my other family members, because of which the vegetable must have never made an appearance in our house.
Then one day, when there wasn't enough time to make the dumplings, or the stuffing, I wanted to make some kind of a quick saute bhaaji (chop, sizzle, and stir) and that was when I deconstructed Mint's 'Ridge Gourd chutney' to make a bhaaji, and it has become a huge favorite ever since.Here it is, adapted and translated with her permission.
Ingredients
2-3 ridge gourds (depending on their size)
4 cloves of garlic
4 green chilies
1-2 Tablespoons oil
1/4 teaspoon mustard seeds
pinch of asafoetida
1/2 teaspoon turmeric
a few curry leaves (optional)
3-4 tablespoons crushed peanuts
1-2 Tablespoons dried shredded coconut
1/2 teaspoon salt, or to taste
about 4 Tablespoons chopped cilantro
Method
Cut off the ends of the ridge gourds. Scrape off the bumpy ridges with a vegetable peeler. Cut each into half lengthwise, and then slice crosswise into half moons. Add the pieces to a bowl of cold water with a teaspoon of salt, for about 10-15 minutes, and drain in a colander before using.
In the meanwhile, prepare the other things. Peel the garlic. Remove the stems of the green chilies and wash them. In a mortar and pestle, smash the garlic and chilies together until they barely hold their shapes. Do not smash into a paste, but you need them to release all their flavor.
Heat the oil in a wide pan or wok. Add the mustard seeds, and when they start to pop, add the asafoetida, turmeric, curry leaves, smashed garlic and chilies, and stir for a few seconds or until the garlic starts to change color slightly.
Add the chopped ridge gourd, and saute just until coated with the seasoned oil. Cook on medium-high heat, stirring occasionaly, until the ridge gourd is almost done. The gourds usually release a fair amount of water, so I do not cover them while cooking.
In the meanwhile, roast the coconut in a small dry skillet until it turns slightly golden brown. When it is cool enough to handle, crush it coarsely with fingers, or a rolling pin, or a pestle.
Add salt to taste, and the crushed peanuts and coconut to the vegetable in the last couple of minutes before turning the heat off, and stir everything around. Add the cilantro just before serving, and serve warm, with polis or rice and dal.

Dodkyachi Bhaaji served with Polis