Showing posts with label region: Punjab. Show all posts

Monday, August 15, 2011

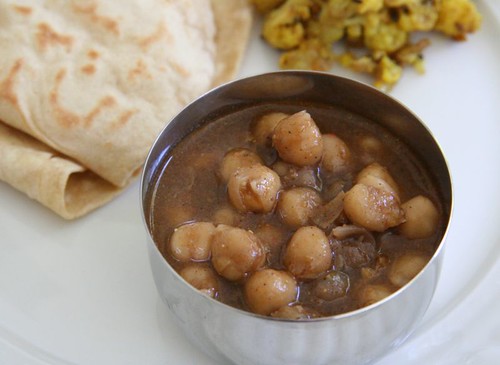
Easiest Chhole Ever

'Easy' is a relative word, and so I should start off by qualifying that this is the easiest of all the chhole recipes that I have tried.

After having tried several chhole recipes, it also happens to be my most favorite in terms of taste, so with a very high taste to effort ratio, it is also the 'Best Chhole Ever' in my world. There is absolutely no chopping involved. Dried garbanzo beans are soaked and cooked, and then mixed with some flavorful dried spices. Simple and delicious. If anyone remembers the old 'bawarchi' site, that is where I got this recipe. The accompanying description by the contributor said that his mother learned to make it from a street vendor near their house in Delhi. Street, vendor, chhole, delhi, conjured up an image of something truly delicious and authentic in my mind, and the recipe did not disappoint.

The link has changed twice since, but this is where the original resides now. I use a lot less oil than specified, and it still seems fine to me.

Even if you like the usual chhole with onions and tomatoes, I recommend you give this a try, if only to compare and decide.

Chhole

Chhole

Ingredients

1 cup dried garbanzo beans
1 tea-bag
1 bay leaf

1/4 teaspoon red chili powder (cayenne)
1 teaspoon ground coriander
1 teaspoon amchoor (dried mango powder)
1/2 teaspoon garam masala
1/2 teaspoon chhole masala (or chana masala)
1/8 teaspoon black pepper
1 teaspoon salt (or to taste)
1 Tablespoon (or less) oil
pinch of cumin seeds (optional)

Method

Soak the garbanzo beans in a large bowl with plenty of water for 8-10 hours. Rinse and drain them when you are ready to cook. You can cook them in a pressure cooker with the standard three-whistle regulation that you might be using for dal, or you can cook them over a stove-top, which could take 45 minutes to an hour.

I use a pressure cooker, with a small pot inside with the beans. To the garbanzo beans, add one tea-bag (remove label if it has one), one bay leaf, and enough water to cover the beans completely. A little extra water doesn't hurt. Let the pressure drop on its own, and then drain the beans in a large sieve or colander, making sure you save the cooking water.

Measure out all the dry spices in a small bowl, and mix them all with the warm beans to distribute them completely.

Heat the oil in large pan or wok. Add the cumin seeds (if using) and when they start to sizzle, add the beans and stir together. Add the cooking water a little at a time, and keep stirring gently until you have enough to form the gravy (sauce).

Thursday, October 21, 2010

Rajma-ah!

Right now, there are four types of tomatoes on the kitchen counter. There are tiny cherry tomatoes, colorful heirlooms and no-name cooking tomatoes from the Farmers' market, and more heirloom tomatoes from a friend's yard. Yes, sounds like fall around here! September through early November usually yields some of the best local tomatoes in our area. As the weather starts to cool off, it is also a perfect time to use these tomatoes in long simmered dishes, like Rajma, which is a household favorite. I did not grow up eating Rajma, and I don't recall it ever being made at home, so I have had to try various recipes to get it right. The one I finally settled on is based on Sanjeev Kapoor's 'Khazana of Indian Vegetarian Recipes'. Some of his recipes are really foolproof and delicious, like this one for instance. Even though it looks like a standard 'onion-tomato-masala' gravy, the proportions are so perfect that I never need to wing it. The few changes I have made are reducing the amount of chili powder, and usually doing away with the garam masala.

While having good tomatoes is quite necessary, the key ingredient here is of course, the rajma itself. Many years ago I landed on a truly dud batch of red kidney beans bought in a local Indian store. Despite the standard soaking and pressure cooking the beans were rock hard, or barely cooked. This happened on multiple tries. Soon after that, during a trip to India I went looking for 'rajma' at my neighborhood grocer. He brought out two kinds, one that was pink and he called as 'regular' rajma, and a deep maroon one that he called as 'Kashmiri rajma'. Both were much smaller in size than what I usually see here. I bought back a kilo of the 'Kashmiri' variety, and was hooked. The beans are so creamy and delicious when cooked that I could never again bear to buy the gigantic beans from the Indian stores here.

Types of Beans

If you can find the dried 'Kashmiri' or other rajma from India, definitely use those. If not, Italian Borlotti beans or Cranberry beans are quite good too, or use small pinto beans. Some of the darker bean varieties from Rancho Gordo would be definitely worthwhile too, with some experimentation. I was once gifted a bag of their 'Red Nightfall' beans, and cooked some of them rajma style. The beans were very flavorful on their own so I had to go easy on the spices, but the result was excellent.

Rajma

Rajma Rasmisa
Adapted from 'Khazana of Indian Vegetarian Recipes'

Serves 4

Ingredients

1 cup Kashmiri rajma (dried beans)
2 ripe tomatoes, medium sized
2 Tablespoons oil
1 cassia leaf
1 small red onion
4 cloves of garlic
1/2 inch piece of ginger
3/4 - 1 teaspoon red chili powder (cayenne) or to taste
2 teaspoons coriander powder
3/4 teaspoon cumin powder
1/4 teaspoon turmeric
1/4 teaspoon mild garam masala (optional)
1-2 teaspoons salt (or to taste)

Method

Soak the beans in plenty of water for 6-8 hours or overnight. Drain the water, add fresh water and cook until the beans are tender. I use a pressure cooker and use my 3-whistle regulation.

Puree the tomatoes. Chop the onions fine. Grate the ginger and finely mince the garlic, or make a paste of the ginger and garlic together.

Measure out the red chili powder (cayenne), coriander powder, cumin powder, and turmeric in a small bowl.

Heat the oil in a large and wide heavy bottomed pan. Add the cassia leaf, followed by the onion and saute until they start to turn slightly brown. Add the ginger and garlic and saute for a minute. Add the spice powders, and stir around, reducing heat if needed.

Add the tomato puree and some salt, and stir it around. When the tomatoes have lost their moisture and are completely cooked, add the cooked rajma, with its cooking liquid as needed, and simmer on medium heat for 10-15 minutes. Add salt to taste. If using garam masala, add it.

Note

I usually check the beans after they have simmered with the rest of the ingredients, and if they taste flavorful enough I do not add any garam masala.

I also do not add any chopped cilantro in this, but that would be a common addition as well.

I am sending this to SunshineMom for World Vegan Day.

Monday, March 03, 2008

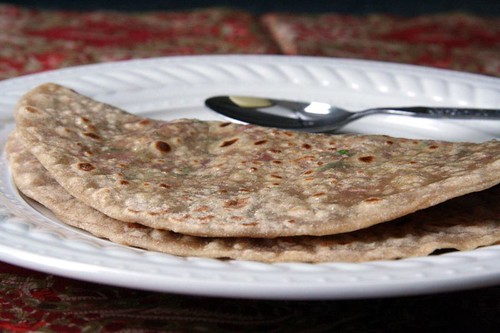
Watermelon Radish Parathas

mooli ke parathe

There were exactly three types of parathas made in our home - alu, methi, and gobi. If there had been any other types, then clearly I have forgotten. In contrast, I have been quite a rebel adventurer. Spinach, cabbage, paneer, beets, pumpkin, cheese, broccoli, peas, dals, mint, chutneys, molagaipodi, even leftover sabjees, have all had played a part in my parathas at some time or the other, with varied results. At this, Musical might just yawn and say, "So what? We make parathas with almost anything". Of course she does, but considering what I grew up with, this is quite a repertoire.

Stuffed Radish Parathas

A paratha related mini-obsession started recently when a friend was visiting our area during Christmas break last year. We met for lunch at a basic, almost divey, Indian restaurant where we could eat good food, and talk for a long time without being bothered. The meal included giant parathas - I had gobi and she had mooli, and of course we tasted both. I liked the gobi, but the mooli one with a generous filling of spiced radishes was so good that I wished that I had ordered that one instead.

Very soon I was hankering for it at home, and wanted to give it a try. It was further fueled when my friend and I reminisced about the parathas we had. I used to make mooli parathas years ago, but because I found it difficult to make the stuffed ones, (this was just for mooli, not other types of parathas) I used to go the lazy route and mix in grated daikon radish with flour and spices to make the dough for the parathas. In fact this was many times a quick weeknight dinner that didn't need much planning if there was a white radish in the fridge. Somewhere along the way, I stopped making these and had even forgotten about them, but after tasting the wonderful stuffed parathas at the restaurant I realized how much better they tasted, with the filling sandwiched between the dough, giving you a little crust and a little taste of the vegetable in each bite. Soon I was on a mission to find out how to get the stuffed ones right. Once again, I tried to roll them out by filling the radish mixture into a ball of dough but the shreds kept leaking out and making a mess on the board. A big salaam to those who are able to roll those out, but I have just not been able to do that well. That is when Musical's "two layered parathas" really came to the rescue by working as perfectly as she describes. So a big Thank You, Musical!

For my paratha experiments, I used watermelon radishes (see note at end) just because I happened to have a bunch of them, an added bonus of which is that the filling looks very pretty when the parathas is torn off. One can use any kind of radish, larger ones being better because they are easier to grate.

There are all kinds of recipes for the filling, with additions ranging from turmeric to grated onion, so I decided to try out a few. In the first batch I tried Musical's combination of garam masala and red chili powder, and in the second batch I used Saffronhut's combination of ginger, green chilies and cilantro. I preferred the heat of red chili powder over that of green chilies, but I enjoyed the flavor of ginger. I am neutral about the cilantro as it did not seem to add much but wasn't bad. What I have given below is what I tried in the third batch, and liked a lot, but I might try other versions in the future. Ultimately, there is not one right thing, so experiment, have fun, and let your taste buds and mood decide. Do you have a favorite combination that you would like to share?

In a paradoxical way, while on one hand this is free form cooking at its best, it needs lots of practice to get it just right.

Mooli Paratha: the making of

Stuffed Radish Parathas / Mooli Parathas

Ingredients

1-1/2 cups grated radish, not tightly packed
salt to taste
3/4 teaspoon red chili powder to taste
1/4 teaspoon mild garam masala
1 teaspoon finely grated ginger
2 cups atta
salt to taste
a little oil for the dough
oil or ghee for the parathas

Method

Place the grated radishes in a sieve or colander over a bowl, and add salt to it. Let it sit for about 30 minutes. The salt will draw out moisture from the radishes. Squeeze the radishes by hand, and collect the squeezed water in the bowl.

Use this water to knead the dough using flour and salt, adding more regular water as required. When the dough is kneaded smooth smear the ball of dough with a touch of oil. Divide the dough into 8 pieces of equal size.

Mix the grated radish with red chili powder, garam masala and grated ginger.

Start heating a tava.

Roll out one of the pieces of dough to about 6 inches round and keep it on a plate. Roll out another piece to about the same size. Spread about a fourth of the filling on it, leaving a small edge all around. Top with the previously rolled out roti, gently press the edges together, and roll lightly with the rolling pin just a little more until the 3 layers are held together. Put the paratha on the heated tava and cook on both sides. Drizzle a little oil around the edge if you like. I just like to brush some ghee on the paratha after it is done. Repeat this exercise with the rest of the dough and filling.

Serve with chutney, pickles, yogurt. For an added indulgence, try sour cream or crème fraîche.

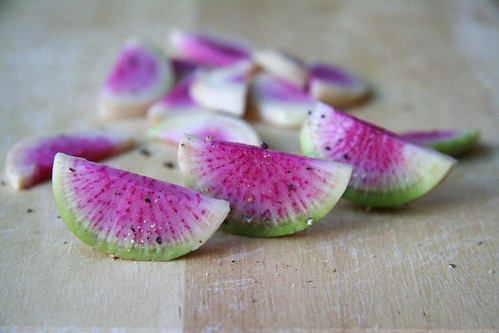
Watermelon Radishes

In the last year or two I have been buying watermelon radishes from the farmers market whenever I see them. They taste very similar to regular radishes, maybe even a tad sweeter, but they look absolutely gorgeous. They have a greenish white skin, and inside they are a bright fuschia or deep red in color, and when sliced, they look like tiny watermelon wedges. For a simple but striking salad, I peel and slice them thin, and sprinkle a little coarse salt and ground black pepper which looks almost like seeds on them.


Watermelon Radishes: Farmers Market Find

Friday, June 29, 2007

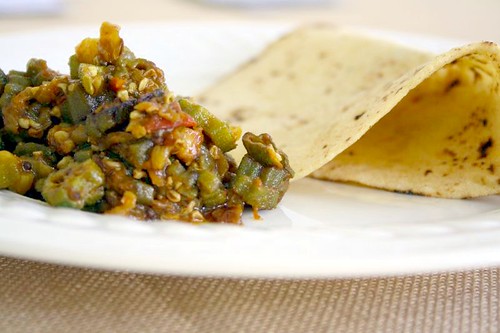
Bhindi Masala

When I go out to eat, I usually like to order something that I don't particularly enjoy making at home either because it is too complicated, or needs a lot of time or patience, or involves deep frying, or for myriad other reasons. So I was quite surprised when I was eating with a bunch of friends when someone ordered 'Bhindi Masala'. Why would one order something as simple as that, I thought. I know that everyone has their own preferences when eating out, and some prefer to stay within familiar limits, but this wasn't the case here. As it turned out, she was not very comfortable making it at home. I know she is a good cook, so it had nothing to do with her skills either. Perhaps she did not have a good recipe. Whatever. I will leave that in the realm of conjecture.

Bhindi Masala with Tomato 2

There are many people who have extreme reactions to Okra (Bhindi in Hindi, Bhendi in Marathi, Bhinda in Gujrati). There are those who like it so much that they can eat it as often as they can, and there are those who cannot stand it, usually because of the seeds or because of the slime. Then there are those like me who are more, ahem, balanced, about it. We like to eat it once every so often, but will not go overboard with it.

Selecting Okra

Fresh okra is available increasingly now in regular grocery stores as well as at farmers' markets, and especially during spring and summer. Look for uniformly green pods, that are tender and firm but not tough. Oh, and try not to snap the end of each pod to check if they are good. Snap one if you must, and if a batch is good, they are all likely to be good.

Cleaning and Prepping Okra

To avoid the okra getting slimy while it is being cooked, it is important that it is very dry beforehand. Washing okra is not recommended. I wipe each pod of okra with a damp towel, and let it dry completely before chopping. Trim off the ends before chopping it further as required by a recipe. Some preparations like 'Stuffed Bhindi' need only one slit along the length to create a pocket for the filling.

I make 'Bhindi Masala' two different ways, sometimes with tomato and sometimes without it, and I like both of them. Okra is capable of taking a lot of spice without getting too spicy, so do not be afraid to season it well. While cooking, add salt only towards the end, as salt tends to draw out moisture, which makes it undesirably sticky. I like the okra to be cooked well, to a point where it is crisp and has some brown spots. Best to serve with phulkaas, parathas, or rotis, with any kind of thick dal on the side.

Bhindi Masala (with tomato)

1 lb bhindi (okra)
1 medium yellow onion
1-2 ripe tomatoes, (1 is enough if it is large)
2-3 Tablespoons of oil
1 teaspoon of ghee (optional, but definitely adds to the flavor)
pinch of mustard seeds
1/2 teaspoon of cumin seeds
1/4 teaspoon of fennel seeds
1/4 teaspoon of turmeric
1/2 teaspoon of chili powder
1/2 teaspoon cumin powder
1/2 teaspoon coriander powder
few pinches ground black pepper
1/2 teaspoon amchoor (dried raw mango powder)
1/2 teaspoon garam masala
1/2 teaspoon of sugar
1 teaspoon salt, or to taste
2 Tablespoons chopped cilantro, optional

Clean the okra with a damp towel, and after it is completely dry, slice each pod of okra into thin rounds, discarding the ends. Slice the onion thinly and chop the tomato finely.

In a large kadhai or wok, heat the oil and ghee, and add mustard seeds. When they start to pop, add the cumin and fennel seeds, followed by onion, and saute for a minute. Add turmeric and okra and saute till it starts to change color slightly. Let it cook for a few minutes, then add the tomatoes and chili powder, and continue to stir-fry on medium-low heat until everything is cooked together, which takes 5-10 minutes depending on the okra. At the end, add salt, and the remaining spices, and keep cooking for a few more minutes on low heat, stirring if required. Add cilantro.

Without tomato

Bindi Masala without tomato

Everything stays the same, but increase the amount of amchoor to 1 teaspoon, and do not add sugar. The okra tends to get crisper in this version; since there is no tomato, the overall moisture content is reduced.

Note: A true Punj is likely to scoff at the mention of sugar in a sabjee, even in a tiny amount, so feel free to leave it out for authenticity's sake. I think it balances the acidity of the tomato and amchoor and helps to caramelize the okra very well. Mustard too, is not commonly added to Punjabi sabjees, so you can leave that out too.


I am sending this to the 'Regional Cuisines of India - Punjab' event.
Related Posts Plugin for WordPress, Blogger...