Sunday, December 30, 2007

Crushed Peanuts

dANyAcha kUT

Focus on Crushed Peanuts
This picture is my entry to the Click event: Powdered peanuts ready for cooking are the focus here, with the peanuts a step below, and peanuts in their shell in the bokeh.

Peanuts are a staple in Marathi food and in a few other regional Indian cuisines as well, in many different forms, but the most common way of using them is either crushed or powdered. They are used in koshimbirs and salads, (a few recipes should be coming up), sabudana khichadi (a quick version of which is already a favorite) and other food that is eaten for fasts, for stuffings and gravies (not of the Thanksgiving variety!), in various snacks like besan coated, spiced and fried peanuts, and even in sweets. The list can go on.

In India, we used to buy the peanuts with the skin on them, which were then roasted at home in a thick kadhai. This caused the skin to blister and get brittle. When cooled, the peanuts were rubbed between palms to remove the skin, and then the skin could be separated from the nuts and discarded. The peanuts were then ready to be used for cooking. In the days before electrical gadgets, a large batch of the peanuts were pounded in a stone mortar to get a coarse powder which was then stored to be used.

Here, I buy roasted peanuts, which I quickly pulse a few times in the food processor as required. I rarely make a large batch to keep, just because it is so convenient to make some when I need it.

For times when you don't have a food processor, or might be too bothered to wash the bowls, there comes a tip from a friend who often reads this blog and sometimes comments. She says that you can put the requisite amount of peanuts in a strong 'ziplock' style plastic bag, close the bag after removing any excess air, lay it flat, and use a rolling pin to crush the peanuts inside the bag as coarse or fine as you like. Voila, powdered peanuts ready to be used in Maharashtrian and other dishes. I have tried it, and it really works well.

Focus on Peanuts
This is a picture with the peanuts in focus, and is not an entry to the Click event.

Tuesday, December 18, 2007

First Blogiversary

Jangiri in the South, Imarti in the North

A year ago I took the first step towards making this blog a reality by writing my first post. For months before that, I had several ideas on what I wanted to write, and had even registered the blog name, but as days and weeks went by, I wasn't sure if I should really write what I wanted to. Then finally, I decided that could just try it out and see how it goes, and before I knew it, a year has already flown by.

I have to thank everyone who has been associated with the blog in any way, especially those who stop by with comments, and those who spread the word via links, and last but not least, my non-blogging friends who use the recipes from here and are always sweet enough to let me know when they do.

Monday, December 17, 2007

Apple Corer

Apple Corer

The 'Apple Corer' was among the first single function kitchen items I bought, purely for its novelty value more than anything else. Yet, I find myself reaching for this little tool so often that I thought I should do a post about it, especially now that apple season is upon us. The corer is to be held vertically, with sharp side down, to core out the seedy middle that is generally not eaten or used. After that, the apple can be peeled if needed, and sliced or chopped as required.

I make this Apple Chutney, and also an Apple Pickle about once a year. Other than that, I use apples in various salads, and sometimes for baking, but primarily for eating on their own, sliced. It might look as though it is one additional thing to wash, but it it not that significant an effort, and so well worth it.

There are also tools that core and wedge apples at the same time, that are likely to be just as useful, but I have not convinced myself yet that I need one of those. In the meanwhile, this works!

Sunday, December 16, 2007

Apple Apricot and Fig Chutney

One good substitution deserves another

Food bloggers can be admirably observant at times. For instance, consider the picture of a plateful of food, with poori and bhaji as stars of the post, and yet, what two of my favorite bloggers, Richa and Bee asked me was about the tiny speck of Apple Chutney, which was nearly hidden under a papad! Giving them the recipe was the easy part, but if I had to post it, then an unwritten requirement was to take a halfway decent photo of it, and that meant I needed a fresh batch of it, since I was already out of it.

The original recipe is from Madhur Jaffrey's Indian Cooking, and called 'Apple, Peach and Apricot Chutney' translated into Hindi as 'sev, aroo, aur kubani ki chutney'. Even though one should not judge food by looks alone, it was the orange hued picture of the chutney in a silver bowl that first caught my attention and made me want to try it out. I checked how many apples it called for, and set two aside to make a half batch of it. It was when I was ready to start cooking that I realized that I did not have any dried peaches. Dried apricots are usually in the pantry, but dried peaches, never. Ever so resourceful, I used dried papaya instead and proceeded, and it was a hit. It was absolutely easy to make, and it was evident that the quantities of the seasonings could be easily adjusted according to taste.

The next time, I didn't have any dried papaya, so I used dried figs from India, you know, those types that come in the form of discs on some sort of a string, most often seen in the Diwali dry fruit boxes wrapped with yellow cellophane? I don't particularly like those, and don't remember how they landed home, but they were sitting for a long time, so they were put to good use in the chutney in place of the dried papaya, I mean, peaches. So that's the story of the chutney that the ladies spotted in the picture.

Now with the bounty of delicious local fall and winter apples here, that is what I decided to make, but this time, I didn't have any dried figs on hand either! So I went to buy some and was staring at the Black Mission and Calimyrna, thinking what a difficult choice this was, did a eena-meena-mina-mo on them, and went for the Calimyrnas. The apples I used were Jonagolds, but nearly any type of apple works here just fine.

Apple Chutney with Apricots, Raisins, and Figs

Apple Apricot and Fig (or Peach or Papaya) Chutney

Yields
About 4 cups chutney

Ingredients

1/2 kg apples (4-5 medium sized apples)
3/4 cup dried apricots
3/4 cup dried figs
1/2 cup golden raisins
4 cloves garlic
2 X 1 inch cube ginger
1-1/2 cups white vinegar
1-1/2 cups granulated sugar
2 teaspoons salt
1 teaspoon cayenne pepper

Method

Core, peel, and chop the apples. Chop the dried figs and apricots into pieces as large or small as you like. Mince the garlic, and grate the ginger.

Combine all the ingredients in a medium sized stainless steel pan, and bring to a boil. Turn the heat to medium-low and cook for about 30-40 minutes until it reaches a thick consistency similar to jam. Stir occasionally if required to prevent sticking.

Let it cool in the pan for some time. It will thicken slightly more as it cools. Let cool completely before filling into a jar.

Notes, Substitutions

  • The above recipe is what I have made, with changes to the original. I have reduced the amount of garlic a little, and increased the amount of cayenne pepper.
  • The original recipe uses white wine vinegar, but I use white distilled vinegar or apple cider vinegar. The vinegar could fume during cooking, so make sure to turn on the exhaust or keep a window open.
  • I have reduced the amount of sugar significantly from the original, and yet it is somewhat sweet in taste, but the sugar is required for preserving the chutney for a longer period. I have been able to keep the chutney in good condition for a few months without having to refrigerate it.

Taking a cue from a certain new cookbook title, this chutney is tangy, tart, hot and sweet! It should also come with a warning that there is a danger that this chutney might be consumed in side dish quantities rather than as a condiment, but that should be alright, considering that it contains things that are mostly good for you.

Friday, December 07, 2007

'That' Methi Dal

Trying to recreate something from the past

It all started when a friend and I were talking and sharing our memories of hiking in the Sahyadris. Anyone who has ever hiked there knows of the joys - of walking through the hills in the rains, through the lush green grass, and the chipik chipik mud, of the smell of the pure air, the cool monsoon breezes, and of the rush of reaching the end of a trail or the top of a peak, or fort. Even though we did not know each other during our hiking days it turned out that we had been to many of the same trails and forts. So on we talked, of the people, the camaraderie, and of course the food, or lack thereof. I usually took food from home, as did most other people, and we usually shared it with our co-hikers, sometimes stopping whenever we were hungry, and sometimes waiting for everyone to get to the top to share our dabbas.

My friend spoke with great nostalgia about a spicy methi with dal and lots of green chilies that she had eaten with bhakris on one such trip. Even though it had been several years since then, she called it one of the best methichi bhaaji she had ever had. The person who had brought it happened to be a peon at her workplace, so there was not a chance of getting the recipe. It wasn't something I could relate to immediately, but started to have faint recollections of having eaten something similar somewhere too. Couldn't place it, and yet it seemed familiar.

Sometime after that conversation, I went to Bangalore during a visit to India, and friends of mine who live there took us out to eat a bhakri meal, or jolada roti as they called it, which is common in the northern parts of Karnataka close to the border with Maharashtra. The traditional meal came served on a banana leaf, and one of the things on it was what I thought could have been the dal-methi my friend had talked about! Here it is in the picture below, in the top right corner.

Northern Karnataka meal on banana leaf

After I came back here, I had more clues as to what to expect in terms of the taste, with the experience still fresh in my mind. I looked through some of my cookbooks to see if they had anything and Ruchira, the marathi cookbook had a recipe for something similar that used moong dal, but what I recalled was toor. So I decided to give it a try with toor dal and see if it tastes like it, and it pretty much did! I send the recipe to my friend to see what she thought, and when she gave it the thumbs up, I knew it was a success.

This dish is somewhere between a dal and a bhaji and is a very basic, rustic dish. It is neither runny nor dry and tastes great with bhakris. My guess is that it tastes best when made on a slow coal fire, and is probably cooked when methi is plentiful and in season, but cannot go far enough, which is why the dal is used to make it more substantial and economical.

Methi Dal

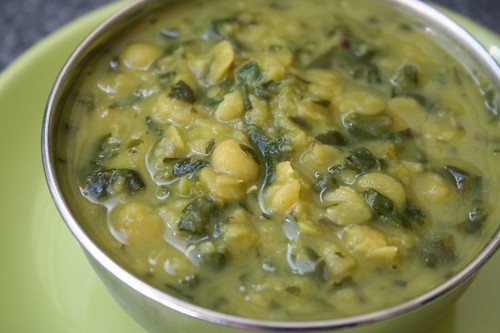
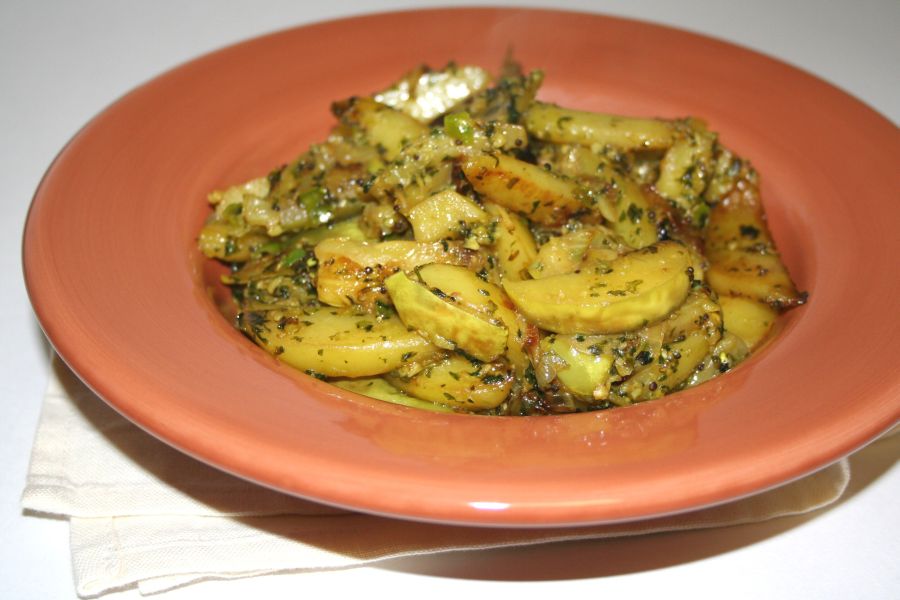
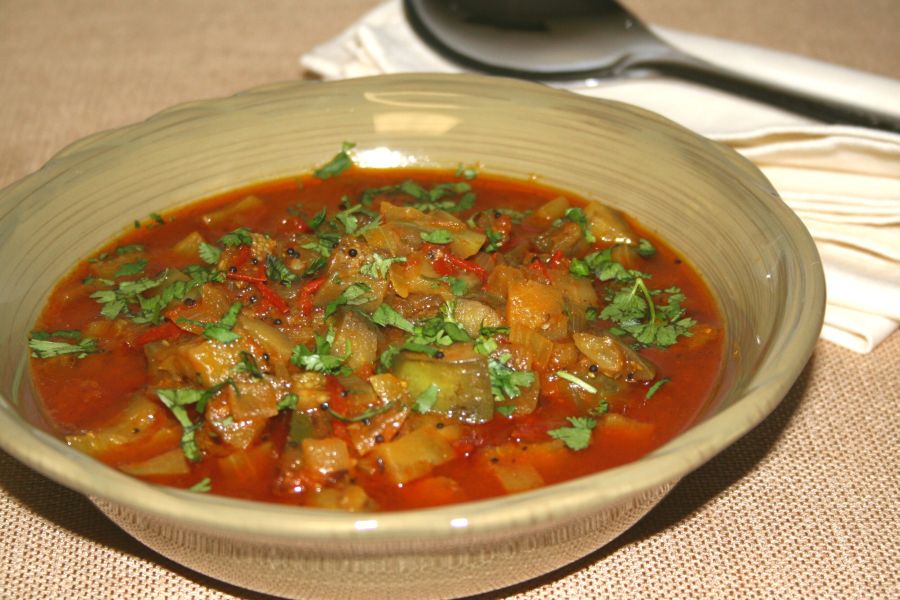
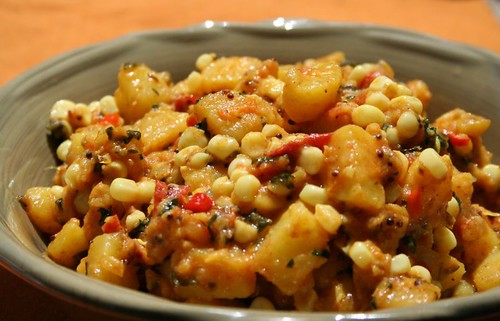
Methi and toor dal bhaaji

Serves 2 as a side, but can be scaled easily.

1/2 cup toor dal
1 big bunch of methi
2-4 green chilies (depending on size of chili and desired spiciness)
2 tablespoons of oil
salt to taste
pinch of sugar (optional)

Rinse the dal a few times and soak it in warm water for 5-6 hours.

Split the chilies into 2 along the length.

Just before cooking, drain the dal. In a large pan or wok, heat the oil, and add the chilies to it. Add the dal, stir it around in the oil, add 1 cup of water, and bring it to a boil. Place a lid on the pan and lower the heat. Let the dal cook until it is tender, adding more water as required. This could take somewhere between 30-40 minutes.

In the meanwhile, clean the methi, plucking the leaves and throwing away the stalks. Wash, spin, and chop the leaves fine.

When the dal is cooked, and has absorbed all the water, add the chopped methi, salt to taste, and sugar. Let it cook for another 10-15 minutes on moderate heat, without the lid.

Notes
The dal could be cooked in a pressure cooker too, but that would make it very soft like varan, which is not the desired consistency here.

One could also add mustard seeds and turmeric in the tadka, but I like the simplicity of the few strong ingredients.


Now 'this' humble methi dal goes to Linda, who is hosting Jihva: Toor Dal.

If any of you know what my friend could have been talking about, or have a different recipe for this, I would definitely love to hear about it.

Tuesday, December 04, 2007

Baby vegetables in Cilantro Lemongrass broth

The only herb that is nearly always in my fridge, and most likely in other Indian fridges too, is cilantro. The first thing I do after getting cilantro home is trim off the hard stalk portion, then wrap the leafy part in a paper towel, and this package then goes off into a plastic box, to be used as required. The cilantro stays fine for a couple of weeks.

If the stalks are particularly healthy and fresh, and if I have even a few additional minutes, one of the things I like to do instead of throwing the stalks away is to drop them into a large pan of water and bring the water to a boil. Add a few chunks of ginger either bruised by a pestle or grated, a few crushed peppercorns, some salt, and within about 15-20 minutes, a rather delicious cilantro-ginger broth is ready. Once strained, it can be sipped just by itself, or used as a base for soups, dal, or noodle dishes.

Making broth

The variations on this simple basic are endless. Sometimes I add slices of lime or lemon to it, sometimes, a bay leaf. This time I used a couple of stalks of lemongrass, roughly cut into pieces and smashed, and let those boil with everything else, infusing the broth with the characteristic flavor of lemongrass.

Baby Vegetables

To it, I added some fresh baby vegetables, such as baby carrots small enough to fit in the palm of one's hand, along with various baby squashes like zucchini, yellow crookneck, sunburst and pattypan, all so tiny that they barely needed to be halved. I let the vegetables cook in the clear stock for a few minutes until they were fork tender, garnished with a bit of finely chopped cilantro, and an austerely beautiful and surprisingly satisfying first course was ladled out.

Soup

Wednesday, November 28, 2007

Oven cooked Baby potatoes in Tomato gravy

Arguably, some of the best chefs in the world are men, but I know very few men who cook regularly. Among Indian men, it is practically a rarity, and even rarer are those who are actually interested in cooking. So much for all the fights for parity, the daily cooking grind is most often borne by women. I don't want to turn this post into one with shades of feminism, but instead acknowledge a friend, who is among the few men who enjoy not just cooking and eating, but also discerning and discussing all about it. He has several superb recipes, and now I have his permission to blog a few of them which are among my favorites. You are in for a treat. Here's to men who cook!

From my own experience, this is a great dish to make for large gathering for several reasons. First of all, it scales up very easily. The dish can be put together slightly ahead of time, and the cooking can be finished in the last one hour. By finishing the cooking of the potatoes in the oven, one gains space on the stove top, which is very useful when cooking several things together. If not, that time could be used to clear up the counter or do something else. To top it all, it looks gorgeous, tastes delicious, and is a perfect accompaniment to almost any type of meal.

In this recipe I used the list of ingredients from the base recipe, but modified the technique a couple of ways and even made it more elaborate. Usually people simplify recipes, but here, I added steps. I blanch and peel the tomatoes before pureeing, whereas the original recipe just calls for blending the onion, ginger, garlic, and tomatoes all together. Feel free to do that, but I like the texture of the gravy to be smooth and silky, so I don't mind the extra effort.

Baby potatoes in tomato gravy

Oven cooked baby potatoes in tomato gravy

about 15 baby potatoes (see notes)
2-3 cloves garlic
1 inch piece ginger
1 medium onion
2-3 ripe medium tomatoes (I like lots of gravy in this, so I use 3)
1-2 tablespoons oil
3-4 cloves
1 stick cinnamon

1/2 teaspoon turmeric
1/2-3/4 teaspoon chili powder
salt
pinch of sugar (optional)
pinch of garam masala powder(optional)
chopped cilantro for garnish

To make tomato puree

Bring a pot of water to a boil. Drop the tomatoes into the water, each for about a minute, and take them out using a slotted spoon. When cool, peel the tomatoes and puree them.

Other prep work

Wash and scrub the potatoes.

Process ginger and garlic to a paste, and chop the onion very fine. You can do that in a mini-processor or chopper.

Pre-heat the oven to 350°F.

The first part on the stove top

Heat the oil in a large saute pan, and add the cloves and cinnamon. As soon as they become fragrant, or as the bark starts to uncurl, add the onion, ginger, garlic, and sauté it together until it starts to change color to golden. Add the tomato puree, salt, sugar, turmeric and chili powder, and saute until the tomatoes start to soften.

Add the potatoes, mix thoroughly, and put everything into a baking dish. Add about 1/2 cup or more of water into the pan to get bits of gravy out, and pour it into the dish.

Finishing the cooking in the oven

Cover the dish with an oven proof lid or a piece of foil with a few slits, and place it in the oven and cook for 40 minutes. Uncover the dish and pierce one of the potatoes with a fork to check if it is tender. If not, let it cook for another 10 minutes or until done.

Sprinkle garam masala and chopped cilantro.

Notes

* I like to use the most teeny tiny new potatoes I can find; usually not more than 1-1/2 inches in diameter. I have used regular as well as red new potatoes and they are both equally good.

* I like to use true cinnamon in this recipe, not cassia bark, which is commonly used in many Indian recipes

* You can add 1 tsp of cumin seeds along with the cloves and cinnamon if you like

* It has never taken me more than 40-45 minutes for the potatoes to cook in the oven, but potatoes and ovens could differ, so please check to see if they are done.

* I don't always add garam masala, and it tastes just as good without it.

This dish is naturally vegan and goes to Suganya's Vegan Ventures.

Wednesday, November 21, 2007

Back, and yet not back

Yawning at 10am

4pm stomach growls

Need to take a nap at 6pm

Up at 2am

Sleepless at 5am

All the signs of jet lag, after the long and tiring flights from India, that play havoc with me each time I return. Each time I hope it will be better this time, mind over body, and all that, but no. I succumb. Over the last few days this has slowly diminished, but I am not yet back to cooking anything exciting or new.

So I forced myself out on the weekend to the farmers market, to load up on fresh fruits and vegetables to supplement all the rice and dal eating, and it was raining persimmons! Perfectly sweet for eating out of hand, and a good antidote to that dwindling bag of baakarwadis.

Persimmons in India

Amarphal, aka persimmons in India

In the meanwhile, I am happy to report that persimmons are available in India too. Not necessarily in speciality stores, but even at the regular corner fruitwallah. He called it 'Amarphal', and carried both the Hachiya and Fuyu varieties, though he didn't call them as such. He even knew about that paper-y feeling of Hachiyas. That was a pleasant surprise for me, because growing up I don't recall eating them. He said it came from Kashmir, but look, the sticker on it says 'Kinnaur', which is in Himachal Pradesh.

Fruitwallah

The corner fruit stand where I often stopped by had a great selection of seasonal fruits, including persimmons and fresh figs. My favorite things there were sitaphal and chickoos, both of which I cannot get here.

Wednesday, October 31, 2007

An unexpected break from blogging

Friends, blogreaders, passersby,

This is just a short note to say that I have been in India the last few days and will be here for some more time, so just like my trip, I had to take an unplanned blogging break.

Hope to catch up sometime eventually, but right now there is too much going on. Even though I visit India almost every year, there are things to learn and unlearn and every year I see some more changes. Stay tuned for details later.

Have a Happy Diwali!

Diwali diyas

Our Diwali lamps ready to be placed around the house

Sunday, October 14, 2007

White Eggplant and Potatoes with Garlic and Cilantro

The eggplant tales continue

As far as possible, I like to write a story in my posts, however short it might be; just a little something to give a sense of purpose to the dish I post about. For this one, there just isn't much to say. The recipe itself is based on some random recipe from the web that I copied down years ago (hah, copied down?) and then it underwent some experimentation and changes until it established itself in my permanent repertoire.

It is a simple vegetable dish, that needs a few basic ingredients, and depends solely on the quality and taste of these vegetables and herbs to shine. The only dry spices used are mustard seeds and turmeric and I think one could even leave those out. It is a slight balancing act to make sure that both the potatoes and eggplant cook just right. If either of these gets cooked sooner, it could get mushier than the other. I like to make it with baby eggplants whenever possible, but in this picture I have used one white eggplant. The white eggplant worked perfectly here, because as mentioned in my previous post it holds its shape even when fully cooked.

Cilantro is by far the most common herb used in Indian cooking, usually chopped and added towards the end. This is however one of the few Indian dishes that I make in which cilantro is neither an afterthought nor the main ingredient as in cilantro chutney, and yet it plays a very solid supporting role with its own distinct flavor. It is also one of the few dishes in which the cilantro gets cooked with other things. I would encourage you to use as much as you can here.

Sadly, the dish doesn't even have a proper name to it, and I think the original recipe was called something very generic like green masala vegetables. So I call it 'Eggplant and Potatoes with garlic and cilantro', which is so descriptive that it could as well be a one-line recipe. What's in a name though, when the result is terrific. I like to eat it with fulka or poLI, just like any other sabjee, as part of an Indian meal, but it would be equally delicious as a stuffing for pita bread or other sandwiches.

White Eggplant with cilantro and garlic

Ingredients

4 baby eggplants (or 1 medium sized eggplant)
2 medium potatoes
1/2 medium onion
4 cloves of garlic
2-4 green chilies (depending on size and preferred heat level)
1/2 – 1 cup of chopped cilantro (not tightly packed, about 30-40 healthy stalks)
2 Tablespoons oil
1/2 teaspoon mustard seeds
1/2 teaspoon turmeric
salt to taste

Method

Chop eggplant into quarters or sixths, lengthwise, and place in cold salted water. If using a large eggplant, slice about as thick as large fries (approximately 2 X 3/4 X 1/2 inches in size). Peel and chop potatoes into similar shapes and add it to the water. Slice onion into thick semi circles. Drain the eggplant and potato. Grind the garlic, chilies, cilantro in a food processor.

Heat the oil in a wide saute pan or wok, add the mustard seeds, and when they pop, add the turmeric, followed by the green paste, onion, eggplant and potatoes. Stir fry everything together on high heat. Add salt. Let the vegetables cook and change color, stirring occasionally. If required, place a lid on the pan and lower the heat when the potatoes turn golden. If the mixture starts to stick to the pan, add a tablespoon of water at a time and reduce the heat. Let cook for a few minutes more, and then just a little more more after turning off the heat. Pierce one of the potato pieces to check if it is cooked through.

Notes

Use any type of potato that will hold it shape after it is sauteed. I like to use either Yukon gold, White rose, or red potatoes here.


Cilantro is definitely the most used and favorite herb in my kitchen, and in general, in Indian food, and eggplant is an absolute favorite vegetable, so this makes a fitting entry to the Weekend Herb Blogging Two Year Anniversary at Kalyn's Kitchen, which is being celebrated with a collection of recipes that combine vegetables with herbs. This is my first ever entry to her event.

Wednesday, October 10, 2007

A gift of White Eggplants leads to classic Eggplant Rassa

Gifts are usually a matter of taste, and with food gifts that is twice as true (see the terrible pun?). Luckily, I have been at the receiving end of some excellent food gifts recently. Like these white eggplants, which came along with the Thelma Sanders squash, but I am finally writing about it now.

White Eggplants

I had heard and read about white eggplants in relation to the explanation for how aubergines came to be called as egg-plants, but hadn't ever seen them. These particular ones weren't as small as eggs, but were smaller than regular purple globe eggplants. To me, the best part about these was that they were grown in a farm roughly 55 miles from where I live. Oh what a treat these were! They were like regular eggplants, but somehow more delicious, slightly sweeter and creamier, and yet they held their shape when fully cooked. They were also in some way denser than regular eggplants, which means there was more volume than I expected when chopped.

Thoroughly excited by the prospect of cooking with these, I went back and forth over which of my favorite recipes I should use them in. Since I also had some late summer tomatoes, I thought I'd combine the two into a rassa, which is a fairly typical Maharashtrian stew like dish, with a spicy broth. It is a simple and almost rustic dish that depends on good hearty ingredients, that are chopped and cooked together in a large pot, but the result is a whole lot better than the sum of its parts. A rassa is usually served as part of a typical meal that would include poLIs, rice, dal, and perhaps a chutney or koshimbir.

What really delighted me in this case was that the rassa tasted so much better than usual - naturally, the only thing that could have made a difference had to be the taste of the eggplant itself, all other factors being equal. So I have been on the lookout for these ever since then, but have yet to see them around.

Vangi Rassa

White Eggplants: Rassa

Ingredients

1 Tablespoon oil
1/2 teaspoon mustard seeds
pinch of fenugreek / methi seeds (optional)
1/2 teaspoon cumin seeds
pinch of asafoetida (hing)
1/2 teaspoon turmeric
1/2 of a small yellow onion
2 small tomatoes (or 1 large)
1/2 - 1 teaspoon chili powder
1 small white eggplant (or roughly 1/2 of a regular purple eggplant)
3/4 cup water
1 teaspoon goda masala
salt to taste
chopped cilantro leaves

Method

Chop the onion and tomato. Dice the eggplant and add it to a pot of cold salted water. Just before cooking, drain the eggplant.

Heat the oil in a large pan, and add the mustard and (optional) fenugreek seeds. When the mustard seeds start to pop, add the cumin seeds, asafoetida, turmeric, and onion. Saute the onion for a couple of minutes, and add the tomato and chili powder. Saute briefly, and add the eggplant. Saute everything together for another minute or two, and add the water.

When the water comes to a boil, add salt, and turn the heat down, and let it simmer together until the eggplant is cooked. You could close the pan with a lid to speed up the cooking. When nearly done, there should be very little water left, but a small amount of broth that results from the cooking is desirable, and is essentially the 'ras'.

Add the goDA masala, cook for a few more minutes and then let the pan sit on the (still hot) stove for 5-10 minutes to allow the flavors to blend. Add the cilantro.

Variations

Sometimes potatoes are added to this, and that becomes a vangi-batata rassa. They are diced and added along with the onion, and the quantity is variable.

Friday, September 28, 2007

Peach Cobbler

Making the most of the last peaches of the season

Peach Cobbler: Served

The peach stands were still around the last couple of weeks, and the aroma that wafts out of them was on the decline, but I couldn't resist buying a few good peaches before they stop showing up completely. Wise decision that, because these peaches were really tasty. While the temptation to eat them simply sliced was very strong, so was the pull to try them in a dessert. I especially wanted to try the cobbler that I had made earlier with cherries, to see whether it would work for peaches as well.

Peach Cobbler: Before Baking
Peach Cobbler: Before Baking, Yellow and White Peaches arranged alternately

Having used the recipe before, I made two substitutions, one healthy, and the other decadent. Instead of using all flour, I used quick cooking oats in the mix, and for a classic pairing with peaches, I used Amaretto instead of vanilla extract. The Amaretto vanished considerably upon baking, but the underlying flavor is wonderful, so use it if you have it. I also reduced the amount of sugar further down because the peaches were very sweet.

It all worked just fabulously, and the result was one delicious dessert. Served with ice-cream it is nothing short of bliss. It is going to be on my must-do list every summer from now on!


Peach Cobbler: After Baking

Peach and Amaretto Cobbler

Serves about 8-10 for dessert

Ingredients

3 firm ripe peaches (or enough to yield 2 cups when sliced)
1/2 cup butter

3 Tablespoons white sugar
1 Tablespoon all-purpose flour

3/4 cup all-purpose flour
1/4 cup quick cooking oats (or all-purpose flour)
3/4 cup - 1 cup white sugar (depending on how sweet the fruit is)
1 teaspoon baking powder
1 cup milk
1 Tablespoon Amaretto

Method

Bring water to a boil in a saucepan. Blanch the peaches for 1 minute and remove with a slotted spoon. Peel the peaches when cool enough to handle, and slice evenly.

Preheat the oven to 350 degrees F (175 degrees C). Place the butter in a 9x13 inch baking dish, and place in the oven to melt while the oven is preheating. Remove as soon as butter has melted, about 5 minutes.

In a medium bowl, toss the sliced peaches with the 3 Tablespoons of sugar and 1 tablespoon of flour.

In a medium bowl, stir together the rest of the flour, oats, sugar, and baking powder. Add the milk and Amaretto and whisk until well blended, then pour the batter into the pan over the butter. Do not stir.

Distribute the sliced peaches evenly over the batter.

Bake for about 45 minutes in the preheated oven, until golden brown. A toothpick inserted into the cobber should come out clean.

Buttery notes

This dessert is utterly butterly delicious, but I think it could do with a little less butter. My guess is that 6 Tablespoons would be good if the amount of sugar is being reduced as well, otherwise, keep it at 7 Tablespoons.

Peach Cobbler: Served

Tuesday, September 25, 2007

Thelma Sanders with Bengali seasoning

The Squash

We are at the cusp of seasons now, as early fall produce is rearing its head in the form of squashes, grapes, and figs, but the glories of late summer's tomatoes, peppers, eggplants and strawberries are still around in plenty too. It is in this bountiful period that I received a wonderful surprise from a friend in the form of some of the season's best produce.

Winter Squash: Thelma Sanders
Thelma Sanders Squash

The goodies included one of the signs of cooler weather, a squash, intriguingly called as 'Thelma Sanders'. I found that it is a family heirloom acorn squash from (who else?) Ms. Thelma Sanders of Adair County, Missouri. It has a delicate skin, and not many seeds. It is hard to define its taste, but it is definitely delicious, though not as sweet as butternut squash, which is my favorite. Naturally, it would pair well with plenty of spicing. It retained it shape even after it was fully cooked, and did not get mushy at all.

Winter Squash: Thelma Sanders, cut
Thelma Sanders Squash, cut open

The Book

The recipe in this post is adapted from 'Madhur Jaffrey's World Vegetarian', and called 'Pumpkin or Hubbard Squash cooked with Bengali Seasonings' or 'Bangali Kaddu'. Even though this is one of my favorite cookbooks, I haven't mentioned it on my blog yet because I was waiting to write this particular recipe along with that. This was the first recipe I tried from the book, and boy, it turned out so good that it completely changed the way I looked at pumpkins. That was years ago, but till date, this book remains an absolute favorite, and so does this recipe. In fact, it has now become the touchstone recipe that I use every time I encounter a new type of winter squash.

A few simple whole dry spices and a bit of salt and sugar are all that are required to bring out the intrinsic taste of the squash, without overpowering it. While the original recipe gives intricate proportions for each of the spices in fractions of teaspoons, I generally use generous pinches of everything and do not bother with all the precision. One thing I have noticed about 'World Vegetarian' is that even the Indian recipes in the book taste a little bland to me. So, although I am not a fan of very hot and spicy food, I usually increase the chili or pepper quotient in those. Accordingly, this recipe has all the ingredients from the original, except that I add a bit of turmeric and red chili powder, and a few cloves. I also do not mash the pumpkin at the end, which is what the original recipe says.

A note about the oil: The original recipe says to use either mustard or olive oil. The authentic Bengali dish is most likely to have mustard oil in it, so I tried using it, but because there are so many aromatic spices in this dish, I prefer to use a neutral oil, like the light olive oil that I use for most everyday cooking.

Winter Squash: Bengali Style

The recipe

Serves 2-3

Ingredients

About 1 lb winter squash (in this case Thelma Sanders)
2-3 Tablespoons oil
1/2 teaspoon mustard seeds
1/2 teaspoon cumin seeds
1/4 teaspoon fennel seeds
1/8 teaspoon fenugreek seeds (methi dana)
1/4 teaspoon nigella (kalonji)
a few cloves
1-2 bay leaves
1-2 dried red chilies, broken into pieces

1/4 teaspoon turmeric
1/2 teaspoon red chili powder
a teaspoon of salt, or to taste
1-2 Tablespoons of brown sugar

Method

Peel the squash and cut into approximately 1 inch cubes.

Measure out the cumin seeds, fennel seeds, fenugreek seeds, nigella, cloves, bay leaves, and red chilies in a small bowl.

Heat the oil, and add the mustard seeds. As soon as they start to pop, add the rest of the spices from the bowl, followed by the squash. Add the turmeric and chili powder, and a little salt. Stir together until the squash gets coated with the oil and spices. Lower the heat, and cook covered until the squash is tender, stirring now and then and replacing the cover each time. Depending on the squash it could take 20 - 30 minutes. When it is done, add the sugar and a little more salt, turn off the heat, and let it sit on the (still) hot stove for a few minutes, so that the sugar melts gently.

Serve it as part of a regular Indian meal, with rotis, poLIs, parathas, or rice and dal or as a side to any kind of main dish.


Another pumpkin dish on radar this season: Baakar Bhaji

Wednesday, September 19, 2007

Jam Session with Local Strawberries

Organic Local Strawberries
I had nearly finished my shopping at the farmers market and was making my way back when I slowed down at one stall that had strawberries out for tasting. I ate one, and it was so good that within seconds I was inexplicably taken by the idea that I should (or could?) make jam out of it, and before I had thought it through I was lugging a pack of 3 pint boxes of strawberries. There is a good reason these farmers offer those samples, you know.

One thing was sure though, these strawberries tasted amazing, and were easily the best I have had. For within hours, the lot had whittled down, and I was rethinking the plans for the jam. After all, it would be just a load of sugar, under the guise of preserving the season's bounty. Honestly, I was also getting worried about whether it was really worth the efforts. The more I read about canning and sterilizing bottles, the more doubtful I got about what I was getting into.

Flip-flop, flip-flop, but finally, I settled on this basic recipe that does not use any additional pectin, and decided to use clean sterilized jars and not bother with the whole processing in hot water bath, which was becoming the real detriment in my path. Anyway, I had only about a pound and half of strawberries left by now so this wasn't going to be a whole lot of jam - about one jar's worth which would last a few weeks at the most.

After I read some of the comments, I decided to reduce the sugar by half, because the strawberries had an intense and sweet taste on their own and I did not want to overpower that.

The process in pictures

Strawberry Jam: The process

Top L-R: Strawberries, Chopped and mixed with sugar
Bottom L-R: Mashed berries on the stove, Coming to a rolling boil - thermometer firmly in place


Ingredients

2 pounds fresh strawberries
2 cups white sugar
1/4 cup lemon juice

Method

Place three plates in a freezer.

Hull the strawberries. That is, remove the stem and green ends. Chop them up.

In a wide bowl, mix the strawberries and sugar, and crush the berries gently. [I did this by hand.] Leave this for about half an hour, and the sugar will dissolve in the resulting juice.

In a heavy bottomed saucepan, mix together the strawberries, sugar, and lemon juice.

Bring the mixture to a full rolling boil. Stir often, until the mixture reaches 220 degrees F (105 degrees C).

After about 10 minutes of boiling place a spoonful of the liquid of the jam onto one of the cold plates. Return to freezer for a minute. Run your finger through the jam on the plate. If it doesn't try to run back together (if you can make a line through it with your finger) it's ready to be canned. If not, repeat after a few minutes with another cold plate.

Let it cool a little, and then transfer to hot sterile jars. Refrigerate after it has completely cooled.

Strawberry Jam: First Batch

Now, the real test of a good jam also includes how long it stays good, and so far, a month later, this jam has passed it. It tastes just as fabulous as it did to begin with, and many a toasts have been elevated. In fact, the jam making was such a success that last week I bought another 3 pint basket, and made another batch of jam. Now I hope that it lasts just as well, for at least a couple of months, or thereabouts, to remind me of this glorious summer.

Strawberry Jam: Second Batch

Monday, September 10, 2007

Cranberry Beans get into a soup

Cranberry Beans: shelled

Going to the farmers' market is as rewarding as it is challenging. The payoffs are many - fresh local produce, interesting varieties that one would never see in a supermarket, people who are willing to give you a tip or two on how to cook something, photo opportunities, people watching, goods from local bakeries, cheese makers, fresh flowers, live music, and in general, the feeling of all being well with the world, if only temporary.

All this does require some endurance as well as flexibility, because the farmers' markets are only open for a few hours every week, often requiring one to be up early on a weekend morning to get there in time. Once there, one needs to tote everything in hand or on shoulder, as there are no shopping carts, and one needs to dig into the purse for cash for each vendor instead of a final checkout. For me, the rewards far outweigh the effort, and so I try to get there every which weekend I can manage to.

It was during one such visit a few weeks ago that I nearly squealed with joy when I saw cranberry beans. I had read about them and seen pictures of them, but had never actually found them. When I bought a bagful, the young man at the stall told me that I need to cook them in boiling water for about 15 minutes after they are shelled. 'A little olive oil and salt, and they are really good', he added.

Cranberry Beans: with pods

Shelling and Cooking

Accordingly, I put the shelled beans into a pot of water, and boiled them until tender. In the process they lost those glamorous looks and turned into a pinkish beige, and when I tried a few with a touch of salt, the taste was just OK, so I decided to give it a light tadka, and finish with some cumin and coriander powders. The result still tasted just OK, nothing special.

Cranberry Beans usal

The Soup

You might wonder why I am posting about them if I didn't like them as much then. Definitely not because of their photogenic looks, although that would makes a compelling reason to post the pictures at least. Well, it is to write about the soup I made with the broth that resulted from all that bean boiling. It was inspired by a soup called kaLaN in Marathi, which is typically made with the broth that results when beans are cooked, when making usaL for instance.

The color that the cranberry beans lost was gained by the water, and it turned to a blushing pink which is not so visible in the photo. To this broth I added some grated ginger, minced green chilies, salt, a pinch of sugar, and boiled it for another few minutes, then strained it and added some chopped cilantro leaves on top. The result was a delicious and light warming appetizer soup - a lot more delicious than my pictures or words could describe, and the beans were forgiven.

Cranberry Bean broth soup: kaLaN

Wednesday, September 05, 2007

Sweet Coconut Rice

Living as an expat one realizes that festivals seem like festivals only because of the people and the surrounding atmosphere. In fact in the USofA, where I live, festivals are not even called as such, but are called holidays, and what we knew as holidays are strictly vacations.

Last week for example was raksha bandhan, which coincides with the nAraLI pournimA, which is celebrated along the coast of Maharashtra, but one wouldn't have known that by looking around. For the last several years, it has been just another day on the calendar for me, but this year things were different because of the presence of a brother and sister in the house. So naturally there was the rakhi ceremony, but the other visible sign was the traditional nAraLI bhAt or sweet coconut rice that is usually made on this day. Technically, this year nAraLI pournimA was a day before rakha bandhan as per the Hindu calendar, but that did not stop us from celebrating the tradition.

Based on the reactions of some people who were not familiar with this dish, I suspect that it could be an acquired taste. Well, more for me, because I thought it was just lovely and wondered why I hadn't ever made it before. If one likes rice, jaggery, and coconut, one is bound to like it.

I made it based on the recipe from the Marathi cookbook Ruchira, but have added more details and quantities here than in the original. There was also no saffron in the recipe, but I added some for luxury.

nAraLI bhAt
Sweet Coconut Rice


Sweet Coconut Rice

Serves 6-8 for dessert

Ingredients

2 Tablespoons milk
a pinch of saffron strands

1-1/2 cups rice
4 Tablespoons ghee
5-7 cloves
5-6 green cardamom pods
2 cups freshly shredded coconut
2 cups jaggery (not tightly packed)
2-3 T golden raisins
a few Tablespoons sliced almonds

Method

Heat the milk just enough to warm it, crumble in strands of saffron into it, and leave aside.

Wash the rice and leave it to soak in water for 30 minutes to an hour, and drain the water when ready to cook. Heat the ghee in a large saucepan, add the cloves, and then the rice, and stir it around till the rice is coated with the ghee. Add 3 cups of water, bring it to a boil. The turn the heat to medium, place a lid partially on top, and let the rice cook for about 10-15 minutes. Since it has been presoaked, it will take less than usual to cook.

In the meanwhile, peel the cardamom and powder the seeds in a mortar and pestle.

Take the jaggery and coconut in a large wok or kadhai, and cook it together on medium heat until the jaggery has melted. This will take about 10 minutes. Add the cooked rice to it and mix it together along with the cardamom, saffron, golden raisins, and almonds.

Tuesday, August 28, 2007

Corn two ways: roasted bhutta and with potato

As August draws close to an end, I am getting ready to bid adieu to my favorite of the month, the summer corn. When it comes to produce, many people like to think of tomatoes come summer, but for me, it is corn. Especially the freshest fresh corn that one finds in the farmers market. If I could write poems, I would have composed an ode to it by now, but clearly that hasn't happened yet. By the way, frozen or canned do not even come close, and do not enter my thoughts or my kitchen either.

Bhutta: roasted corn

In India, corn or bhutta is usually eaten as a roadside snack, roasted over coal, and then sprinkled with lime and salt, sometimes with red chili powder or spices that would be the vendor's secret, and it is as blissful as it gets. Naturally that is my most favorite way to eat as well as cook corn. First, it needs to be roasted, grilled, or broiled to get evenly dark spots all around. In the meanwhile, in a small plate I take salt, red chili powder, some ghee, and wedges of lime. I dip a lime wedge into ghee, then into the salt and chili powder, and rub it all over the corn. Simple and elegant. Occasionally, I chhidkao (sprinkle) some chaat masala too.

In contrast in America, corn is usually a side as part of a meal or used as an ingredient. My introduction to it, of all places, was in the workplace cafeteria, where it was served alongside my entree. Boiled, and slathered with salted butter, it tasted like nothing I had eaten before. I was completely hooked. Corn here is indeed quite something - tender, succulent, sweet, delicious.

Usually every summer after I have had one corn on the cob too many, there are a couple of them in the fridge that need to be used up, and that is when I turn to one of my favorite dishes made with corn and potato. It is based on a recipe from the book 'Indian Cooking' written by Madhur Jaffrey and is called 'bhutta aur aloo ki mazedar tarkari', which roughly translates to 'a delicious corn and potato vegetable dish'. As with most of Jaffrey's recipes, I increase the amount of chili powder in it slightly. It can be served with rotis, or rice and dal, or eaten by itself.

Bhutta aur Aloo
Corn and Aloo Sabji

Serves 3-4

3 Tablespoons oil
1/2 teaspoon mustard seeds
1/2 teaspoon cumin seeds
1 clove of garlic, minced
1 medium potato, boiled and diced
1 medium tomato, chopped
4 Tablespoons chopped cilantro
3 Tablespoons chopped mint
1 green chili, chopped
2 cups of corn (roughly from two cobs)
about 1/2 cup coconut milk
salt to taste
3/4 teaspoon red chili powder
1 Tablespoon lime juice (about 1/2 a lime)
1/4 teaspoon ground black pepper
2 teaspoons ground roasted cumin

In a kadhai or wok, heat the oil and add the mustard seeds. When they start to pop, add the cumin seeds, followed by the garlic and potatoes. Stir fry till the potatoes start to turn golden brown. Add the tomato, cilantro, mint, and green chili. Stir around for a couple of minutes, and then add the corn and coconut milk. Stir it to make sure it doesn't stick to the pan. Lower the heat if needed and cook for a few minutes until the corn is cooked. Add the remaining ingredients one by one.

Notes

I don't always add the mint.

Sometime I substitute the coconut milk with whole milk or half and half.

Instead of using a regular potato, I sometimes use about four fingerling potatoes if I have them on hand, and it makes the dish even more wonderful.

A note on coconut milk

In the good old days, coconut milk could have meant only one thing, and that is the milky extract got out of freshly scraped or shredded coconut.

Fast forward to this day and age and there are several easier options available, which are not a patch on the real thing, but unfortunately it is not always possible to get down to making your own when one is constrained for time and when the coconut available itself isn't that great.

So in order of preference, my choices are:

1. Fresh coconut milk, extracted out of a freshly shredded coconut
2. Coconut milk extracted out of frozen shredded coconut
3. Canned coconut milk or powdered coconut cream dissolved in water - depending on the usage, I prefer one over the other.

Saturday, August 18, 2007

The Power of Sugar

Sweet!

It is time to celebrate, as Manisha of Indian Food Rocks, sent me this pretty pink 'Rockin' Girl Blogger' award, which is easily my first award in the world of blogging. Even though it would take a good stretch of the imagination to call me a girl anymore, I love it. I also really don't see myself so much as a blogger as much as someone who has a blog - is there a subtle difference? I still love it. Thanks, Manisha.

rockinggirlblogger

In the tradition of passing on the awards, I started making a list of people I would have liked to send it on to, and the list kept growing, so I pared it down a lot.

Even though both my favorite food blogs incidentally also have some guy power associated with them, this is specially for the women, Melissa of The Travelers Lunchbox and Nicky of Delicious Days.

With so much professional acclaim and press to their credit, I am a complete nobody to give them an award, but this is a token of my appreciation for the huge inspiration that they were to me, and for all the things I am continuously learning from their sites. So I am sending it over to them anyway.

This was also a perfect chance to sing their praises. Detailed crisp writing and the dreamy photographs are what drew me to 'The Travelers Lunchbox', and have kept me there, making me come back, again and again.

To add to all of this, her recipes are excellent. Like this flourless chocolate cake that I made for a potluck dinner that a friend had hosted. Luscious.

'mise en place' for Flourless chocolate cake

Flourless chocolate cake

Her Avocado Milkshake (you read that right) and Pesto Rosso are amazingly good too.

With Nicky's blog, first those photographs hooked me, but once I started reading her posts, it was her attempts to recreate German classics, including those from her grandma's kitchen, that struck a chord with me, as it resonated to a great extent to the way I sometimes try to reach out to my roots via food. From her site, I chose these Sponge Cake Rolls, that I made half with strawberry jam and half with an Alfonso mango jam.

Jam Rolls, still unrolled

Jam Rolls, just rolled and cut

Jam Rolls, finished

If you are not already lost in their site, I recommend this Bircher Müesli too.

Last but not least, I want to pass it to desiknitter, who doesn't yack about food like me, but instead knits knits knits and keeps a lively blog full of interesting episodes in her life. Although, sometimes she slips, and talks about food too. Try that raw mango chutney, it's the best.

kairichi chatni
Related Posts Plugin for WordPress, Blogger...