Friday, September 28, 2007

Peach Cobbler

Making the most of the last peaches of the season

Peach Cobbler: Served

The peach stands were still around the last couple of weeks, and the aroma that wafts out of them was on the decline, but I couldn't resist buying a few good peaches before they stop showing up completely. Wise decision that, because these peaches were really tasty. While the temptation to eat them simply sliced was very strong, so was the pull to try them in a dessert. I especially wanted to try the cobbler that I had made earlier with cherries, to see whether it would work for peaches as well.

Peach Cobbler: Before Baking
Peach Cobbler: Before Baking, Yellow and White Peaches arranged alternately

Having used the recipe before, I made two substitutions, one healthy, and the other decadent. Instead of using all flour, I used quick cooking oats in the mix, and for a classic pairing with peaches, I used Amaretto instead of vanilla extract. The Amaretto vanished considerably upon baking, but the underlying flavor is wonderful, so use it if you have it. I also reduced the amount of sugar further down because the peaches were very sweet.

It all worked just fabulously, and the result was one delicious dessert. Served with ice-cream it is nothing short of bliss. It is going to be on my must-do list every summer from now on!


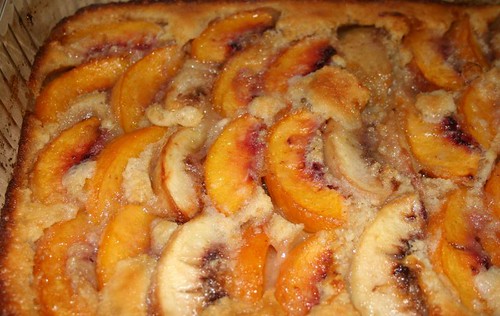
Peach Cobbler: After Baking

Peach and Amaretto Cobbler

Serves about 8-10 for dessert

Ingredients

3 firm ripe peaches (or enough to yield 2 cups when sliced)
1/2 cup butter

3 Tablespoons white sugar
1 Tablespoon all-purpose flour

3/4 cup all-purpose flour
1/4 cup quick cooking oats (or all-purpose flour)
3/4 cup - 1 cup white sugar (depending on how sweet the fruit is)
1 teaspoon baking powder
1 cup milk
1 Tablespoon Amaretto

Method

Bring water to a boil in a saucepan. Blanch the peaches for 1 minute and remove with a slotted spoon. Peel the peaches when cool enough to handle, and slice evenly.

Preheat the oven to 350 degrees F (175 degrees C). Place the butter in a 9x13 inch baking dish, and place in the oven to melt while the oven is preheating. Remove as soon as butter has melted, about 5 minutes.

In a medium bowl, toss the sliced peaches with the 3 Tablespoons of sugar and 1 tablespoon of flour.

In a medium bowl, stir together the rest of the flour, oats, sugar, and baking powder. Add the milk and Amaretto and whisk until well blended, then pour the batter into the pan over the butter. Do not stir.

Distribute the sliced peaches evenly over the batter.

Bake for about 45 minutes in the preheated oven, until golden brown. A toothpick inserted into the cobber should come out clean.

Buttery notes

This dessert is utterly butterly delicious, but I think it could do with a little less butter. My guess is that 6 Tablespoons would be good if the amount of sugar is being reduced as well, otherwise, keep it at 7 Tablespoons.

Peach Cobbler: Served

Tuesday, September 25, 2007

Thelma Sanders with Bengali seasoning

The Squash

We are at the cusp of seasons now, as early fall produce is rearing its head in the form of squashes, grapes, and figs, but the glories of late summer's tomatoes, peppers, eggplants and strawberries are still around in plenty too. It is in this bountiful period that I received a wonderful surprise from a friend in the form of some of the season's best produce.

Winter Squash: Thelma Sanders
Thelma Sanders Squash

The goodies included one of the signs of cooler weather, a squash, intriguingly called as 'Thelma Sanders'. I found that it is a family heirloom acorn squash from (who else?) Ms. Thelma Sanders of Adair County, Missouri. It has a delicate skin, and not many seeds. It is hard to define its taste, but it is definitely delicious, though not as sweet as butternut squash, which is my favorite. Naturally, it would pair well with plenty of spicing. It retained it shape even after it was fully cooked, and did not get mushy at all.

Winter Squash: Thelma Sanders, cut
Thelma Sanders Squash, cut open

The Book

The recipe in this post is adapted from 'Madhur Jaffrey's World Vegetarian', and called 'Pumpkin or Hubbard Squash cooked with Bengali Seasonings' or 'Bangali Kaddu'. Even though this is one of my favorite cookbooks, I haven't mentioned it on my blog yet because I was waiting to write this particular recipe along with that. This was the first recipe I tried from the book, and boy, it turned out so good that it completely changed the way I looked at pumpkins. That was years ago, but till date, this book remains an absolute favorite, and so does this recipe. In fact, it has now become the touchstone recipe that I use every time I encounter a new type of winter squash.

A few simple whole dry spices and a bit of salt and sugar are all that are required to bring out the intrinsic taste of the squash, without overpowering it. While the original recipe gives intricate proportions for each of the spices in fractions of teaspoons, I generally use generous pinches of everything and do not bother with all the precision. One thing I have noticed about 'World Vegetarian' is that even the Indian recipes in the book taste a little bland to me. So, although I am not a fan of very hot and spicy food, I usually increase the chili or pepper quotient in those. Accordingly, this recipe has all the ingredients from the original, except that I add a bit of turmeric and red chili powder, and a few cloves. I also do not mash the pumpkin at the end, which is what the original recipe says.

A note about the oil: The original recipe says to use either mustard or olive oil. The authentic Bengali dish is most likely to have mustard oil in it, so I tried using it, but because there are so many aromatic spices in this dish, I prefer to use a neutral oil, like the light olive oil that I use for most everyday cooking.

Winter Squash: Bengali Style

The recipe

Serves 2-3

Ingredients

About 1 lb winter squash (in this case Thelma Sanders)
2-3 Tablespoons oil
1/2 teaspoon mustard seeds
1/2 teaspoon cumin seeds
1/4 teaspoon fennel seeds
1/8 teaspoon fenugreek seeds (methi dana)
1/4 teaspoon nigella (kalonji)
a few cloves
1-2 bay leaves
1-2 dried red chilies, broken into pieces

1/4 teaspoon turmeric
1/2 teaspoon red chili powder
a teaspoon of salt, or to taste
1-2 Tablespoons of brown sugar

Method

Peel the squash and cut into approximately 1 inch cubes.

Measure out the cumin seeds, fennel seeds, fenugreek seeds, nigella, cloves, bay leaves, and red chilies in a small bowl.

Heat the oil, and add the mustard seeds. As soon as they start to pop, add the rest of the spices from the bowl, followed by the squash. Add the turmeric and chili powder, and a little salt. Stir together until the squash gets coated with the oil and spices. Lower the heat, and cook covered until the squash is tender, stirring now and then and replacing the cover each time. Depending on the squash it could take 20 - 30 minutes. When it is done, add the sugar and a little more salt, turn off the heat, and let it sit on the (still) hot stove for a few minutes, so that the sugar melts gently.

Serve it as part of a regular Indian meal, with rotis, poLIs, parathas, or rice and dal or as a side to any kind of main dish.


Another pumpkin dish on radar this season: Baakar Bhaji

Wednesday, September 19, 2007

Jam Session with Local Strawberries

Organic Local Strawberries
I had nearly finished my shopping at the farmers market and was making my way back when I slowed down at one stall that had strawberries out for tasting. I ate one, and it was so good that within seconds I was inexplicably taken by the idea that I should (or could?) make jam out of it, and before I had thought it through I was lugging a pack of 3 pint boxes of strawberries. There is a good reason these farmers offer those samples, you know.

One thing was sure though, these strawberries tasted amazing, and were easily the best I have had. For within hours, the lot had whittled down, and I was rethinking the plans for the jam. After all, it would be just a load of sugar, under the guise of preserving the season's bounty. Honestly, I was also getting worried about whether it was really worth the efforts. The more I read about canning and sterilizing bottles, the more doubtful I got about what I was getting into.

Flip-flop, flip-flop, but finally, I settled on this basic recipe that does not use any additional pectin, and decided to use clean sterilized jars and not bother with the whole processing in hot water bath, which was becoming the real detriment in my path. Anyway, I had only about a pound and half of strawberries left by now so this wasn't going to be a whole lot of jam - about one jar's worth which would last a few weeks at the most.

After I read some of the comments, I decided to reduce the sugar by half, because the strawberries had an intense and sweet taste on their own and I did not want to overpower that.

The process in pictures

Strawberry Jam: The process

Top L-R: Strawberries, Chopped and mixed with sugar
Bottom L-R: Mashed berries on the stove, Coming to a rolling boil - thermometer firmly in place


Ingredients

2 pounds fresh strawberries
2 cups white sugar
1/4 cup lemon juice

Method

Place three plates in a freezer.

Hull the strawberries. That is, remove the stem and green ends. Chop them up.

In a wide bowl, mix the strawberries and sugar, and crush the berries gently. [I did this by hand.] Leave this for about half an hour, and the sugar will dissolve in the resulting juice.

In a heavy bottomed saucepan, mix together the strawberries, sugar, and lemon juice.

Bring the mixture to a full rolling boil. Stir often, until the mixture reaches 220 degrees F (105 degrees C).

After about 10 minutes of boiling place a spoonful of the liquid of the jam onto one of the cold plates. Return to freezer for a minute. Run your finger through the jam on the plate. If it doesn't try to run back together (if you can make a line through it with your finger) it's ready to be canned. If not, repeat after a few minutes with another cold plate.

Let it cool a little, and then transfer to hot sterile jars. Refrigerate after it has completely cooled.

Strawberry Jam: First Batch

Now, the real test of a good jam also includes how long it stays good, and so far, a month later, this jam has passed it. It tastes just as fabulous as it did to begin with, and many a toasts have been elevated. In fact, the jam making was such a success that last week I bought another 3 pint basket, and made another batch of jam. Now I hope that it lasts just as well, for at least a couple of months, or thereabouts, to remind me of this glorious summer.

Strawberry Jam: Second Batch

Monday, September 10, 2007

Cranberry Beans get into a soup

Cranberry Beans: shelled

Going to the farmers' market is as rewarding as it is challenging. The payoffs are many - fresh local produce, interesting varieties that one would never see in a supermarket, people who are willing to give you a tip or two on how to cook something, photo opportunities, people watching, goods from local bakeries, cheese makers, fresh flowers, live music, and in general, the feeling of all being well with the world, if only temporary.

All this does require some endurance as well as flexibility, because the farmers' markets are only open for a few hours every week, often requiring one to be up early on a weekend morning to get there in time. Once there, one needs to tote everything in hand or on shoulder, as there are no shopping carts, and one needs to dig into the purse for cash for each vendor instead of a final checkout. For me, the rewards far outweigh the effort, and so I try to get there every which weekend I can manage to.

It was during one such visit a few weeks ago that I nearly squealed with joy when I saw cranberry beans. I had read about them and seen pictures of them, but had never actually found them. When I bought a bagful, the young man at the stall told me that I need to cook them in boiling water for about 15 minutes after they are shelled. 'A little olive oil and salt, and they are really good', he added.

Cranberry Beans: with pods

Shelling and Cooking

Accordingly, I put the shelled beans into a pot of water, and boiled them until tender. In the process they lost those glamorous looks and turned into a pinkish beige, and when I tried a few with a touch of salt, the taste was just OK, so I decided to give it a light tadka, and finish with some cumin and coriander powders. The result still tasted just OK, nothing special.

Cranberry Beans usal

The Soup

You might wonder why I am posting about them if I didn't like them as much then. Definitely not because of their photogenic looks, although that would makes a compelling reason to post the pictures at least. Well, it is to write about the soup I made with the broth that resulted from all that bean boiling. It was inspired by a soup called kaLaN in Marathi, which is typically made with the broth that results when beans are cooked, when making usaL for instance.

The color that the cranberry beans lost was gained by the water, and it turned to a blushing pink which is not so visible in the photo. To this broth I added some grated ginger, minced green chilies, salt, a pinch of sugar, and boiled it for another few minutes, then strained it and added some chopped cilantro leaves on top. The result was a delicious and light warming appetizer soup - a lot more delicious than my pictures or words could describe, and the beans were forgiven.

Cranberry Bean broth soup: kaLaN

Wednesday, September 05, 2007

Sweet Coconut Rice

Living as an expat one realizes that festivals seem like festivals only because of the people and the surrounding atmosphere. In fact in the USofA, where I live, festivals are not even called as such, but are called holidays, and what we knew as holidays are strictly vacations.

Last week for example was raksha bandhan, which coincides with the nAraLI pournimA, which is celebrated along the coast of Maharashtra, but one wouldn't have known that by looking around. For the last several years, it has been just another day on the calendar for me, but this year things were different because of the presence of a brother and sister in the house. So naturally there was the rakhi ceremony, but the other visible sign was the traditional nAraLI bhAt or sweet coconut rice that is usually made on this day. Technically, this year nAraLI pournimA was a day before rakha bandhan as per the Hindu calendar, but that did not stop us from celebrating the tradition.

Based on the reactions of some people who were not familiar with this dish, I suspect that it could be an acquired taste. Well, more for me, because I thought it was just lovely and wondered why I hadn't ever made it before. If one likes rice, jaggery, and coconut, one is bound to like it.

I made it based on the recipe from the Marathi cookbook Ruchira, but have added more details and quantities here than in the original. There was also no saffron in the recipe, but I added some for luxury.

nAraLI bhAt
Sweet Coconut Rice


Sweet Coconut Rice

Serves 6-8 for dessert

Ingredients

2 Tablespoons milk
a pinch of saffron strands

1-1/2 cups rice
4 Tablespoons ghee
5-7 cloves
5-6 green cardamom pods
2 cups freshly shredded coconut
2 cups jaggery (not tightly packed)
2-3 T golden raisins
a few Tablespoons sliced almonds

Method

Heat the milk just enough to warm it, crumble in strands of saffron into it, and leave aside.

Wash the rice and leave it to soak in water for 30 minutes to an hour, and drain the water when ready to cook. Heat the ghee in a large saucepan, add the cloves, and then the rice, and stir it around till the rice is coated with the ghee. Add 3 cups of water, bring it to a boil. The turn the heat to medium, place a lid partially on top, and let the rice cook for about 10-15 minutes. Since it has been presoaked, it will take less than usual to cook.

In the meanwhile, peel the cardamom and powder the seeds in a mortar and pestle.

Take the jaggery and coconut in a large wok or kadhai, and cook it together on medium heat until the jaggery has melted. This will take about 10 minutes. Add the cooked rice to it and mix it together along with the cardamom, saffron, golden raisins, and almonds.
Related Posts Plugin for WordPress, Blogger...