Monday, July 28, 2008

Squash Blossoms and Basil Pakoras

One underwhelmed, and the other was a joyous discovery

Squash Blossoms

I don't always buy ingredients because I need to. Sometimes I buy something because I have seen it around for so long that my interest in it has been intrigued, sometimes because it is a hot trendy favorite, and sometimes because it looks too darned pretty to ignore.

With squash blossoms it was all of the above, and I had to finally give in and try them out at least once, so I bought a box without any specific ideas or recipes in mind. As I had known, I found that the most popular way to consume these was to stuff them with cheese and fry them in a flour batter. Naturally, I wanted to put an Indian twist on it, and also skip the cheese.

I made a loose batter with besan, water, salt, pinch of chili powder, and a pinch of ajwain (owa seeds). I intentionally kept the batter neither too thick nor too spicy so that I could discern the flavor and taste of the flowers. Dipped each flower gently into the batter, shook off the excess and deep fried in oil.

After the entire batch of flowers had been fried up, I had a little more batter left so I dipped in some large basil leaves that had been bought on the same day and were very fresh and firm, and fried those too. These little critters were a surprising joy to behold, as they turned into crisp and crackling morsels in the batter.

Squash Blossom Fritters / Pakoras / Bhajias

There is not much to complain about deep fried anything most of the time, but I was not too taken by the flowers this time, although I loved the batter fried basil! Still, I thought I would post this. For those fascinated by the idea of eating flowers, or for those who like squash blossoms otherwise, this might help. Plus, it is just so right to send to Rachna for JFI: Flower Power as well as to Rushina for her Pakora Contest.

Monday, July 21, 2008

Beet and Carrot Salad with Infinite Possibilities

Lately, I have been feeling very inspired to eat more raw foods, not because of the trendy raw foods diet which seems to have gotten increasingly popular over the last few years, but because of one of my recent guests, who has barely turned five. The little charmer has visited a few times over the last couple of years and is getting curiously more interested in food for her age. She wants to snap green beans without me asking her to, she opens the fridge to decide which vegetables should go into the pasta of the day, and asks for the honors of pressing the buttons on the blender. All that is fine, but when she asks me to make her a salad to go with the meal I shudder with a mild pleasant shock. The bigger shock is when she insists on checking every vegetable raw. "Broccoli tastes better when it is cooked than raw", she says conclusively as she chomps on a floret happily.

While I like salads in general, and there are many vegetables and fruits that I would happily eat in their raw state, there are also many others that I would rather have cooked. Beets, for example. As far back as I can remember, I have never disliked beets. Boiled beets, shredded, and served dressed as a koshimbir (a maharashtrian side salad, delicious but underrated) was a huge favorite and still is. When I was still young enough to be in middle school, an older cousin introduced me to lightly cooked beets - she would boil them for a few minutes, then peel them, slice into sticks, add some salt and pepper and have it as a crunchy snack. Later, a friend introduced roasted beets as a technique that preserves the nutrients more than boiling. All good. So naturally, when I read about this raw beets and carrot salad, I was intrigued enough to give it a try. The gorgeous picture with shades of red presented on black helped to add to the allure.

Chioggia Beets, shredded
Shredded Chioggia Beets

Fortunately for me, beets are available here nearly all year around, in different colors and sizes, and with lots of greens attached to it. [I use the greens and stems too, but that is for another post.] When I was ready to make this raw beets salad I had chioggia beets in the fridge, which are usually pink in color outside, and when sliced crosswise, they reveal beautiful concentric circles of pink and white. Otherwise they are almost like regular beets. Right after I peeled and shredded one I had to check out how it tastes, raw, so I tentatively pinched a few strands and ate them. It was great! I added one shredded carrot, a squeeze of lemon juice, a splash of orange juice, some chopped walnuts, salt and pepper and then let it sit for about half an hour. Refreshingly delicious. The earthiness of the beets and sweetness of carrots pairs together to create a combination that amazes with its simplicity. Less is more, indeed.

After tasting this salad I can relate to how this could have been Clotilde's go-to salad for several months. One can make infinite variations on it so it doesn't even have to get boring and taste the same every time. This salad is also wonderful in a sandwich made out of whole wheat pita bread or any other hearty bread, with a load of freshly made hummus. So far I have not tried adding either oil or garlic, both of which are in the original recipe, but here are some add-ins I have tried, with beets, carrots, salt, and a touch of something acidic being the constants.

* pinch of red Indian chili powder instead of black pepper
* chopped cilantro
* grated ginger
* chopped pistachios
* raita style, with yogurt and pinch of cumin powder and red chili powder.

All of these have been just as good, and I am sure I will continue to explore many more.

Carrots, Beet, and Walnut salad

Beets, carrots, a squeeze of lemon juice, a splash of orange juice, chopped walnuts, salt and pepper.

Sunday, July 13, 2008

Pluot Jam puts summer in a jar

Last year's strawberry jam was a tremendous success, and it helped me put into practice two things I had always known, or suspected anyway, in theory - that making jam at home is not difficult, and that jam made at home can taste vastly superior to that bought in a store.

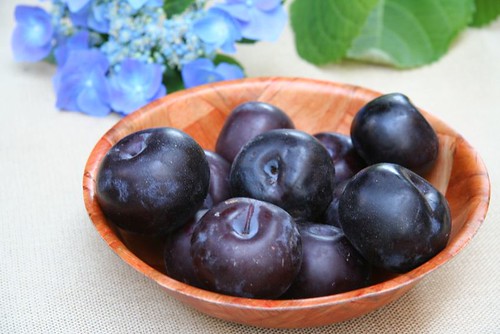
Ever since the local strawberries started appearing in the markets in spring this year, I had been on the lookout for finding the ones that were just perfect to make a new batch of jam, but without much luck. They were ok enough to eat out of hand, but falling short of last year's loot. While I kept saying 'meh' to the ones I tasted, stone fruits started rolling in, in the last few weeks, and as I made a mental note that the pluots seemed really good this time around, I had a why-didn't-I think-of-this-before moment. It struck me that rather than wait for good strawberries to make jam I could turn some of these excellent, sweet as candy pluots into jam!

Pluots: hybrids of plums and apricots

Once the idea was established, I started looking for dependable pluot jam recipes that did not use commercial pectin, and found nearly none. I am guessing it could be because even though pluots have been around and easily available for several years now, there are many people who are not familiar with it. Neither does the Webster dictionary define it yet, nor does the blogger spell checker recognize the word!

Pluots are a complex cross hybrid between a plum and an apricot, and can run the gamut from the more 'plumy' ones to the more 'apricoty' ones in taste, color, and texture. Why not 'aprium' then, you might ask. Well, that exists too, depending on the percentages of the two fruits in the resulting hybrid. The fruits I chose were primarily based on taste, but their gorgeous pink color (don't have a picture of the sliced fruit) added to the charm too.

With the lack of recipes, I went completely on my own, but with fruit, sugar, a little acid, and some common sense, I managed quite well. The result is the perfect example of the fact that if you start with good fruits, you can make some great jam.
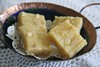
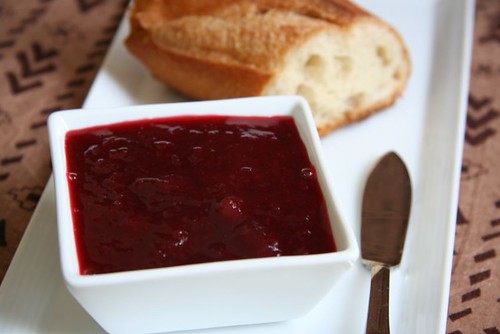
Pluot Jam


Pluot Jam

Ingredients

2 lb pluots (about 12-14)
1.5 cups sugar (or a little less)
2 Tablespoons lemon juice

Method

Place three small plates in a freezer. On a flat surface near the cooking stove lay out a clean dish towel.

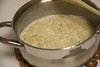
Bring a large wide pot of water to boil. Add in the pluots gently, and after 1 minute, take them out with a slotted spoon, and place on the dish towel. When they are cool to touch, peel them, and place the peeled pluots in a non-reactive bowl.

Remove the pits. Chop or gently mash all the fruits. Add the sugar and leave this for about half an hour, so that the sugar dissolves in the resulting juice.

In a heavy bottomed saucepan, cook the pluots, sugar, and lemon juice together.

Bring the mixture to a full rolling boil. Stir often, until the mixture reaches 220 degrees F (105 degrees C), reducing the heat only slightly if it sticks to the bottom.

After about 10 minutes of boiling, place a spoonful of the jam onto one of the cold plates. Return to freezer for a minute. Run your finger through the jam on the plate. If it doesn't try to run back together (if you can make a line through it with your finger) it's ready. If not, repeat after a few minutes with another cold plate.

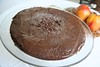
Let it cool a little, and then transfer to hot sterile jars. Refrigerate after it has completely cooled.

Note

Even though I have not tested it, I think regular plums could be used just as well this way to make plum jam.
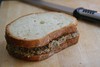
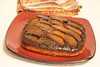
Serving Suggestion

A slice of whole grain bread, pluot jam, and a mild Havarti cheese has been the current choice for a small snack. The jam also makes a perfect addition to the breakfast table, and goes to WBB: Summer.

Thursday, July 03, 2008

Were the brownies outrageous enough?

Two Sweet Reviews

One of the things I find hard to resist is a good brownie. Full of decadent, buttery, chocolate-y goodness, I usually save these for an occasional indulgence, and buy them by the piece, because even though they are fairly easy to make, there are not enough occasions to justify baking a pan full of them. I have a really long list of brownie recipes I would like to try, and I know a good brownie when I eat one, but how am I supposed to tell by just looking at the recipe? All those glamor shots that sometimes accompany them don't help either.

Outrageous Brownies

Not long ago, I mentioned having over a boatload of guests, with varied tastes, and thankfully a few of them were dessert people, so I ruffled through my list to see which one I should try first, and what a difficult decision it was. I settled on Ina Garten's Outrageous Brownies after reading high praise on the user reviews. I followed everything exactly, and they baked up beautifully. Great texture, and pretty good taste. The overall impression however was that the coffee flavor was too strong. The coffee is supposed to boost the chocolate flavor, not overtake it. It is quite possible that the particular coffee I used was too strong, but these brownies tasted good only on the first day and didn't quite hold that well by the next day, which can be a big plus if one is making a tonne of them. And they also didn't do well after freezing (and thawing). Ultimately, this is not the 'it' brownie recipe for me, and I am more likely to try some others in pursuit of the perfect one.

All is not lost in this post though. Here is a plug for a superb Mini Chocolate Cupcakes recipe from Nicole, a prolific blogger and baker. It took me all of 10 minutes to make the batter, and that included opening cupboards, jars, bottles, and sundry containers of ingredients. I needed a tad more milk than specified to get the batter to come together, but a taste of the batter promised great things to come, and these did not disappoint. I have never eaten chocolate cupcakes before. I am not kidding, I have never had an occasion to sample chocolate cupcakes, but these were incredible. I didn't even make the frosting, as I didn't have all the things on hand. I thought of drizzling some ganache over them, but they were mighty good as is. Moist, delicious, easy, eggless, and possibly easy to convert to a vegan version if needed. I can't wait to try them out again. There was a small catch, and even though it didn't matter, I thought I should mention that while I made half the recipe, it was just enough for only 12 mini-muffins. At first I thought I had filled the cups too much, but the cupcakes seem to have risen almost as much as they have in Nicole's pictures.

Mini chocolate cupcakes

Noting down the recipe for future reference.

Mini Chocolate Cupcakes

Makes 12

3/4 cups all purpose flour
1/4 cup cocoa powder
3/4 tsp instant coffee powder (optional)
1/2 cup sugar
1/2 teaspoon baking powder
1/4 teaspoon baking soda
big pinch of salt
3/8 cup milk, or a little more if needed
1/4 cup vegetable oil
1/2 teaspoon vanilla extract

Preheat oven to 350F. Line 12 mini muffin cups with paper liners.

In a large bowl, sift together flour, cocoa power, instant coffee powder, sugar, baking powder, baking soda and salt.

In a medium bowl, whisk together milk, vegetable oil and vanilla extract. Pour into dry ingredients and stir until just combined and no streaks of flour remain.

Distribute batter evenly into prepared muffin cups, filling each about 3/4th full.

Bake for 10-12 minutes, until a tester inserted into the center comes out clean.
Turn cupcakes out onto a wire rack to cool completely.
Related Posts Plugin for WordPress, Blogger...